
Interactions brings together in Contexte everything that reaches you from outside: enquiries from prospects, Google reviews, phone calls, support tickets and Oui Chat messaging. Each screen has a single purpose: to see what is waiting for a reply, and to reply without switching tools.
The module is intended for your agency's team: the person who answers the phone, the one who follows up quotes, the one who handles support. Your clients only see their own tickets.
Access and permissions
The Interactions menu in the sidebar contains the entries Prospects, Avis (Reviews), Appels (Calls), Tickets and Messagerie (Messaging) (the Personnes entry belongs to the Humans module).
- Prospects, Avis, Appels and Messagerie are reserved for the team: you need the “Access Administration Interface” (management) permission on the Interactions component. Without this permission, the page answers “access denied”.
- Tickets only requires being logged in. A team member with the management permission sees all tickets; a client only sees their own tickets and, when the ticketing service is connected, those of their company.
Permissions are set in the Joomla administration, in the options of the Interactions component, on the Permissions tab.
Installation
Interactions is supplied with your Contexte instance. If you are installing the hub yourself, follow the guide Install my Hub instance: the Interactions package is installed there along with the other modules.
Following prospects
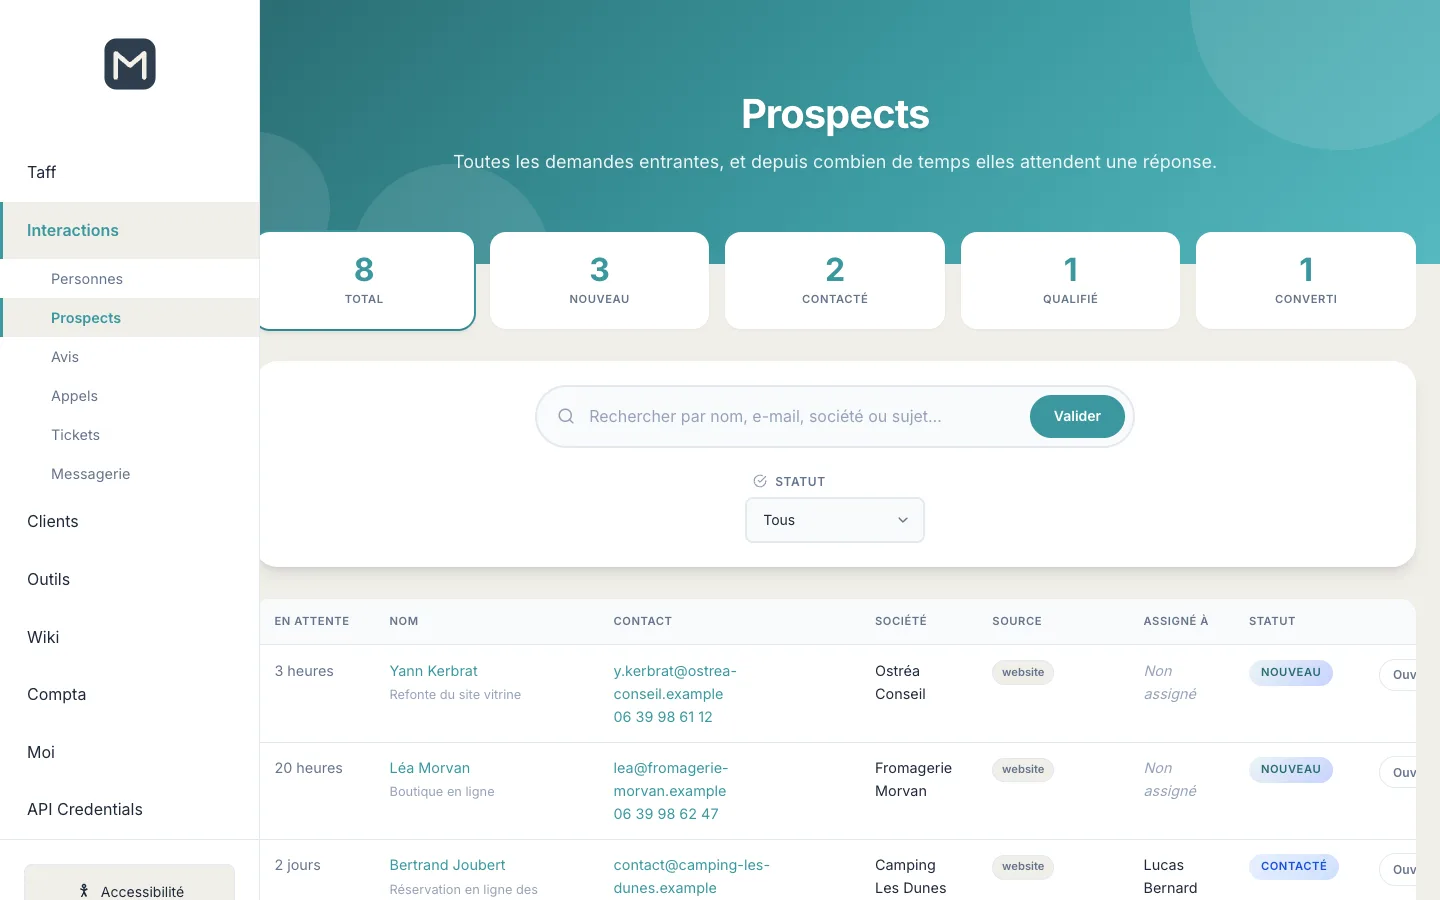
The Prospects page lists all incoming enquiries: contact forms on your sites, enquiries received by email, calls turned into leads. It highlights how long each enquiry has been waiting for a reply.
- Open Interactions › Prospects.
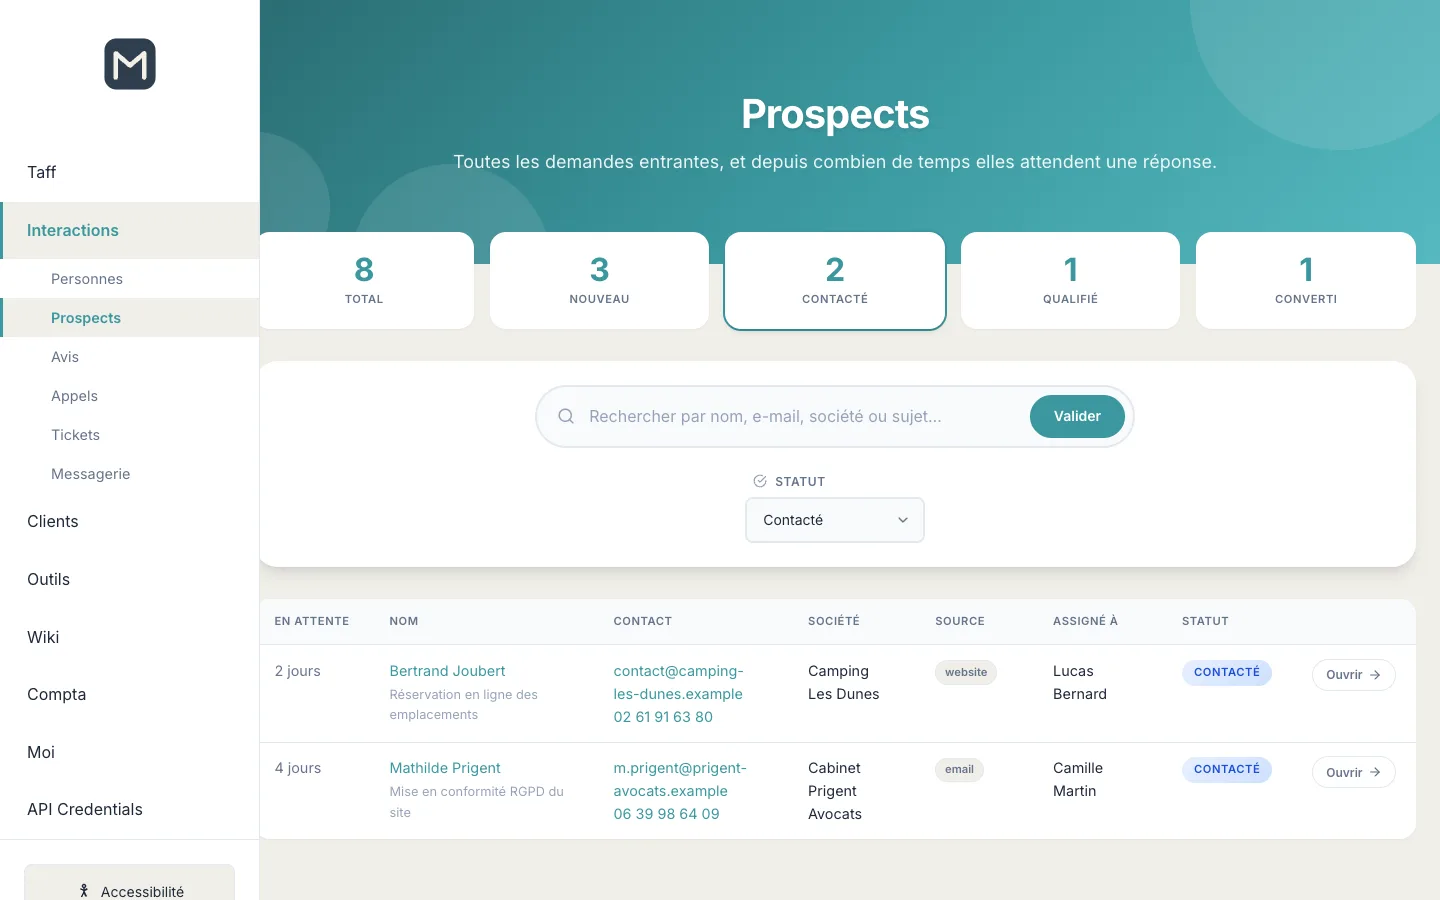
- Read the counters at the top of the page: Total, Nouveau (New), Contacté (Contacted), Qualifié (Qualified), Converti (Converted). Each counter is also a button: click it to show only the prospects with that status.
- To find an enquiry, type a name, an email, a company or a word from the subject in the search box, then Valider (Submit). The Statut drop-down list filters in the same way as the counters.
- Click the prospect's name, or Ouvrir (Open), to display their record.
For each enquiry, the table shows:
- En attente (Waiting): the time elapsed since the enquiry arrived (“3 hours”, “2 days”, “1 week”), most recent first;
- Nom (Name) and subject of the enquiry;
- Contact: email and phone, clickable;
- Société (Company), Source (for example website for a form, phone for a call, email);
- Assigné à (Assigned to): the colleague following the enquiry, or “Non assigné” (Unassigned);
- Statut (Status).
Prospect statuses
- Nouveau: the enquiry has just arrived, nobody has replied yet.
- Contacté: you have got in touch with the person.
- Qualifié: the need is clear and the project is serious, a quote is in sight.
- Converti: the prospect has become a client. The enquiry is closed.
- Rejeté (Rejected): the enquiry is filed with no follow-up. It is closed.
Handling a prospect record
The record shows on the left the enquiry as the person wrote it, and on the right two panels: Suivi (Follow-up) and Détails (Details).
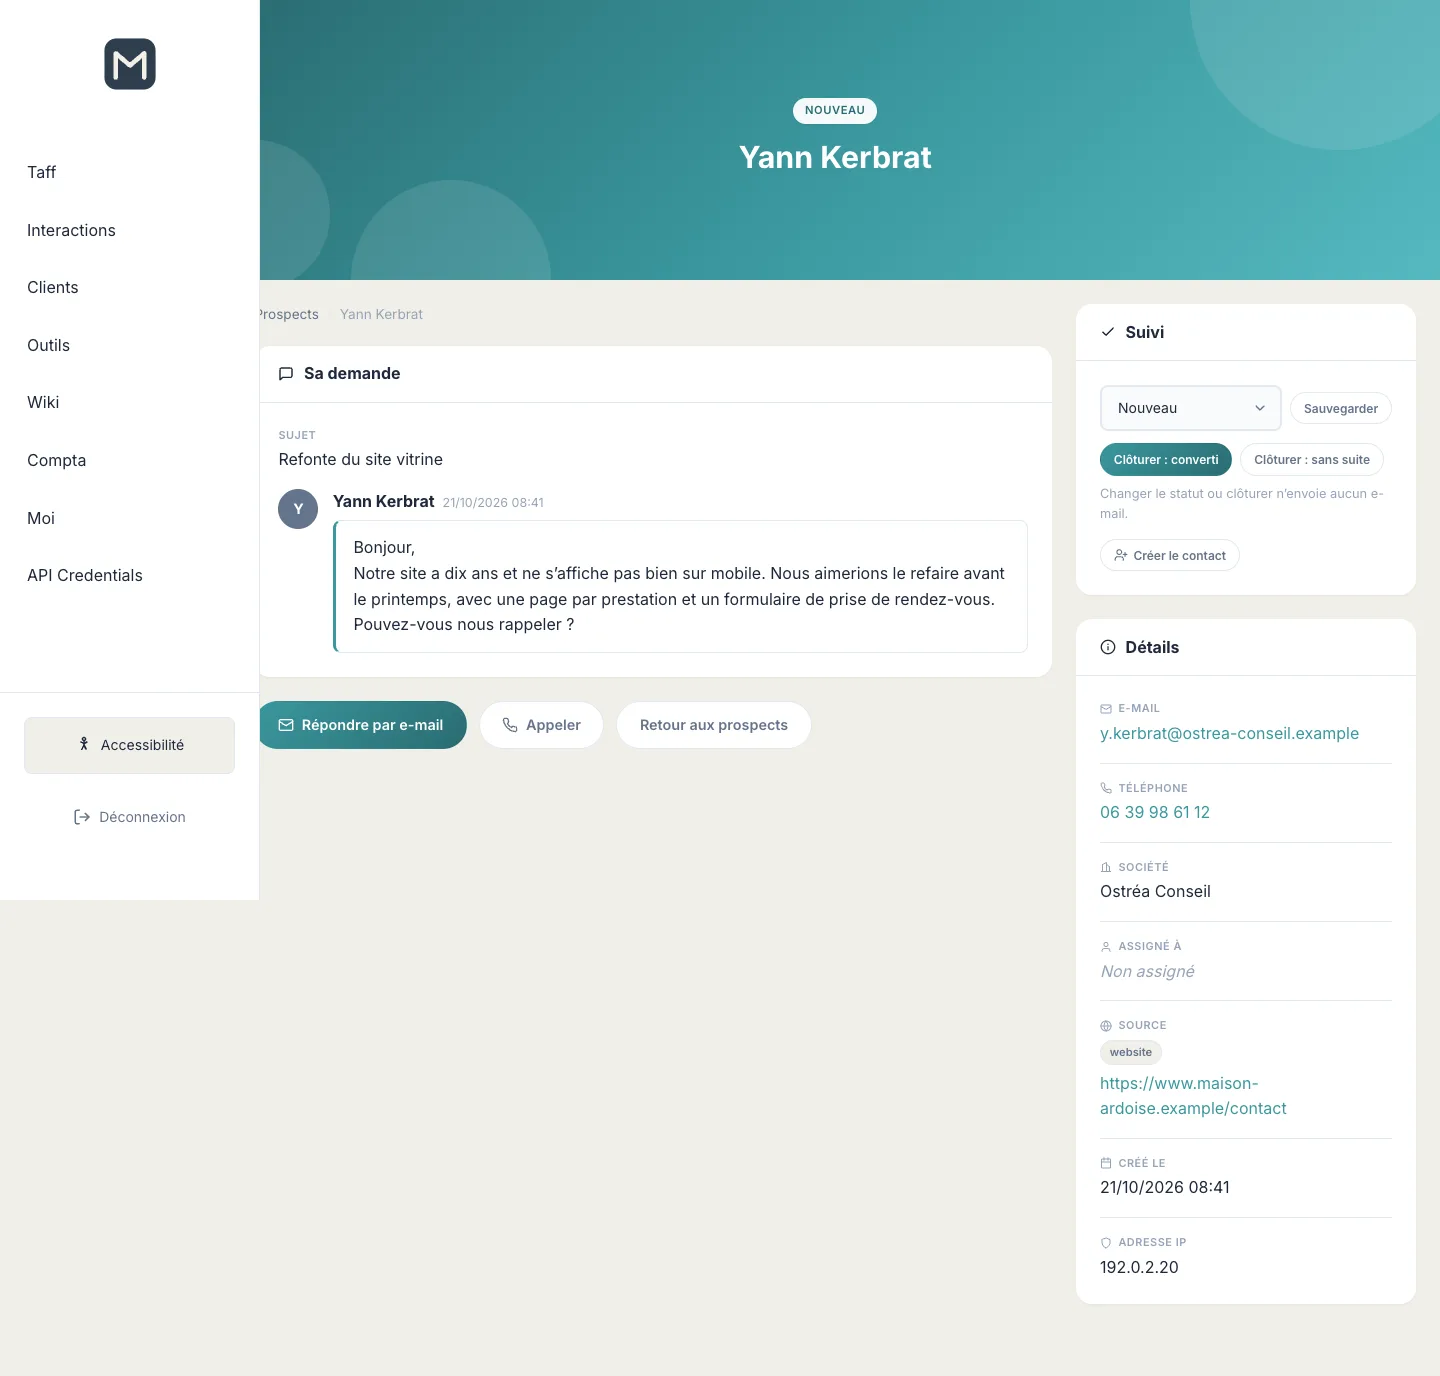
- Read the enquiry in Sa demande (Their enquiry): the subject, then the message, with the date of arrival.
- Reply with Répondre par e-mail (Reply by email) (opens your email client with the address and the subject “Re: …” already filled in) or Appeler (Call) (starts the call from your phone or softphone).
- In the Suivi panel, choose the new status from the list then click Sauvegarder (Save).
- To finish the follow-up in one click, use Clôturer : converti (Close: converted) (the prospect becomes a client) or Clôturer : sans suite (Close: no follow-up) (status Rejeté). These two buttons disappear once the enquiry is closed.
- Click Créer le contact (Create the contact) to save the person in your contacts (Humans module), linked to their company. If the company does not exist yet, it is created. If a contact already has the same email address, no duplicate is created: a “Voir la fiche” (View record) link takes you to the existing contact. When the enquiry has no name or email but has a company, the button becomes Créer la société (Create the company).
Tip: changing the status or closing an enquiry does not send any email to the prospect. You can therefore update the list freely; replying always remains an action on your part.
The Détails panel shows the email, phone, company, assigned person, source (with the address of the page where the form was filled in), creation date, last modification date and the IP address of the submission when known.
Replying to Google reviews
The Avis page gathers the reviews left on the Google Business Profile listings you manage, so you can reply without opening Google.
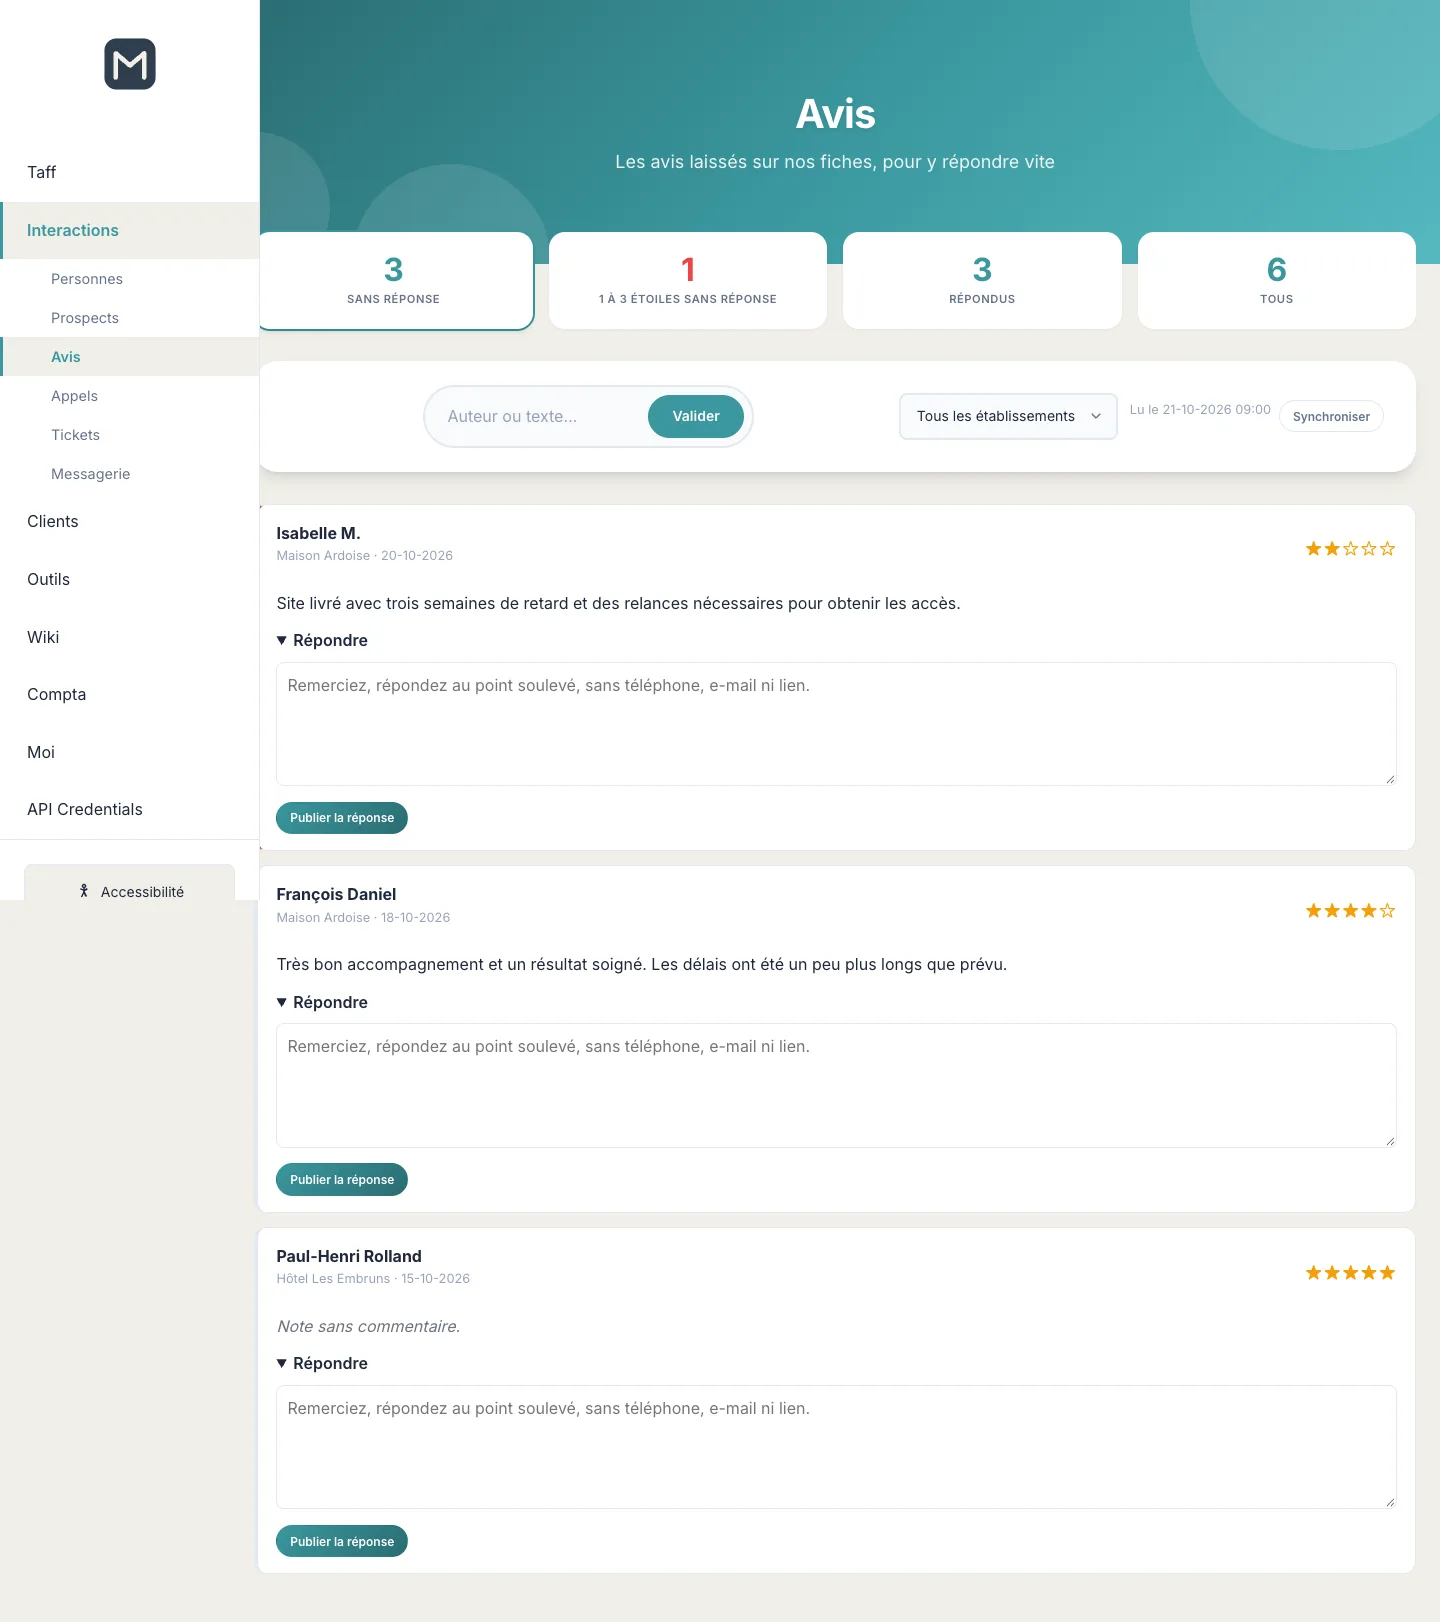
- Open Interactions › Avis. The page opens on the reviews Sans réponse (Without a reply).
- Use the counters to switch views:
- Sans réponse: the reviews you have not replied to yet;
- 1 à 3 étoiles sans réponse (1 to 3 stars without a reply): negative reviews to handle first (the counter turns red if there are any);
- Répondus (Replied): the reviews that already have your reply;
- Tous (All).
- If you manage several listings, choose a business in the Tous les établissements (All businesses) list. The search field finds a review by its author or by a word in the text.
- Under a review without a reply, the Répondre (Reply) field is already open. Write your reply then click Publier la réponse (Publish the reply): it is published on Google with the account that read the review.
In the list, reviews without a reply come before the others, then the lowest ratings, then the most recent. A review without text is shown as “Note sans commentaire” (Rating without a comment).
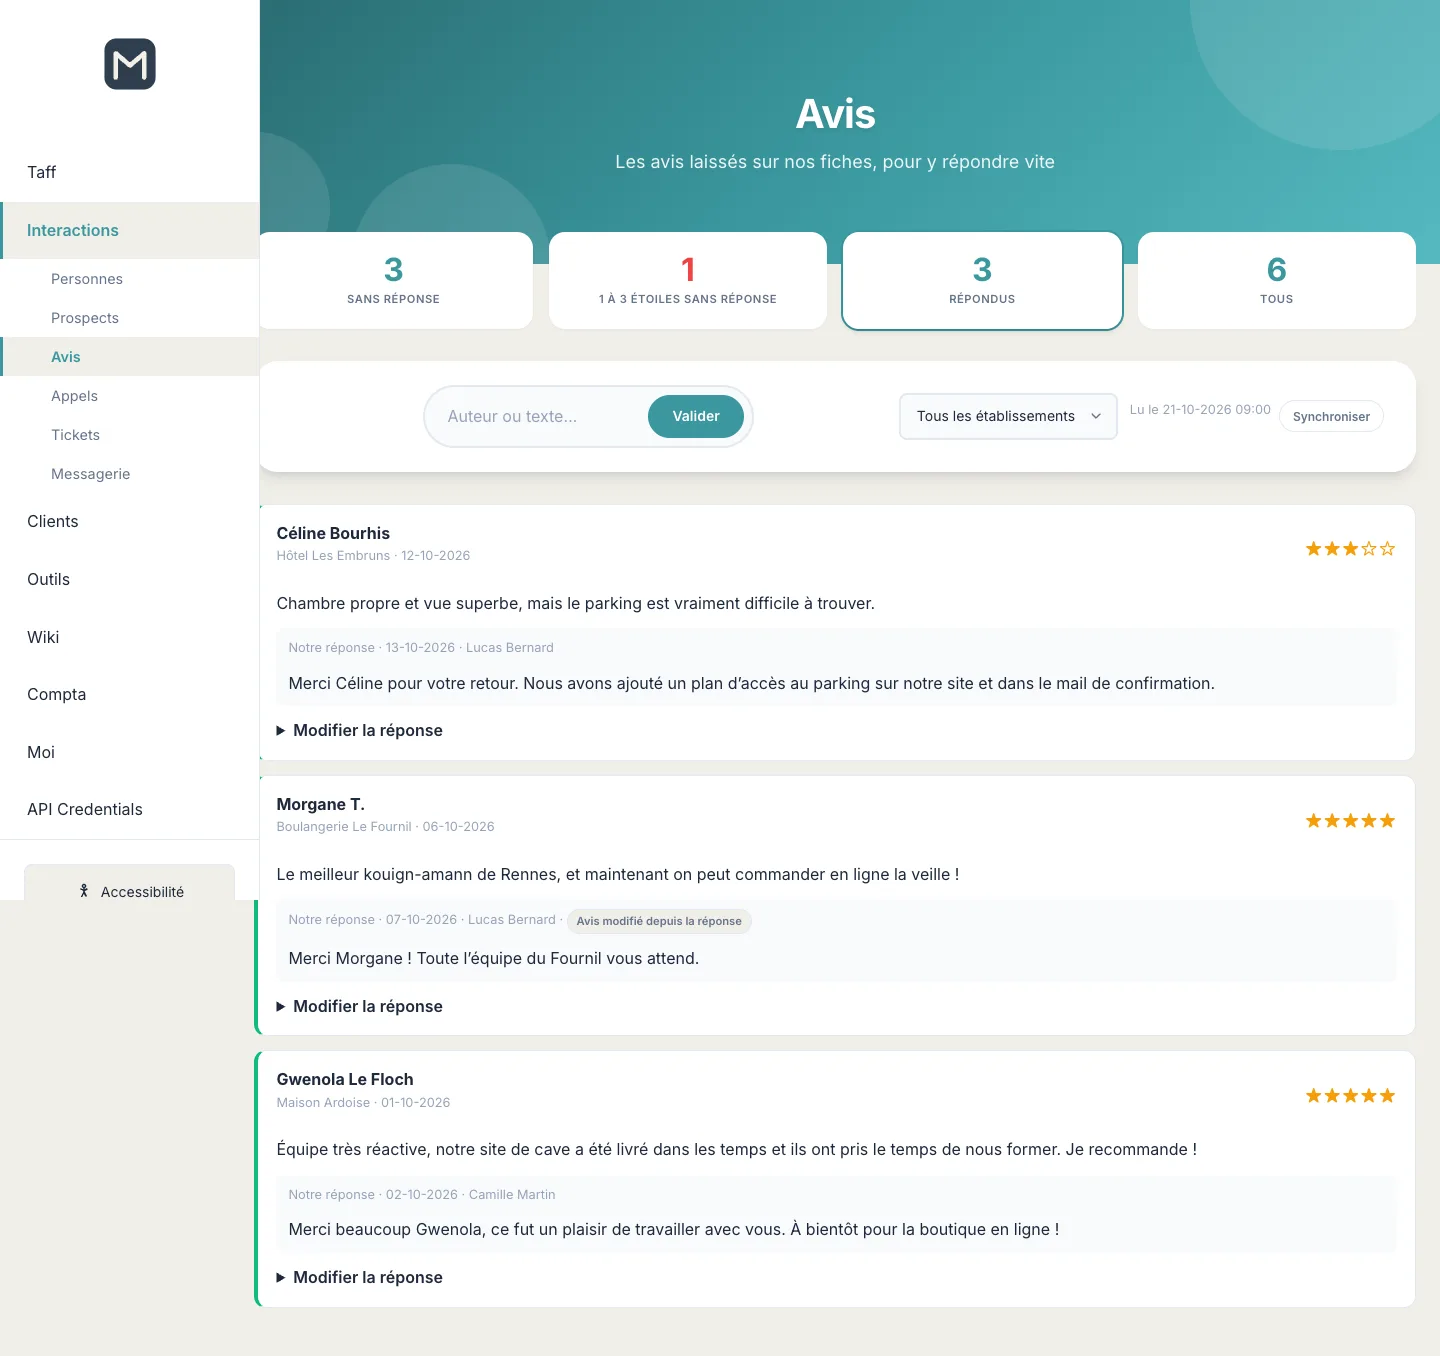
Under a review that has already been replied to, Modifier la réponse (Edit the reply) opens your reply so you can correct it; Voir sur Google (View on Google) opens the review on Google when its link is known. If Google has not yet approved a reply, its moderation state is shown next to the date.
The hub re-reads the reviews on its own when you open the page (at most once every few minutes); the date of the last read is shown next to the Synchroniser (Sync) button, which forces a full re-read.
Tip: follow the advice shown in the reply field: thank the reviewer, respond to the point raised, with no phone number, email or link. Google may reject a reply that contains one.
Following calls
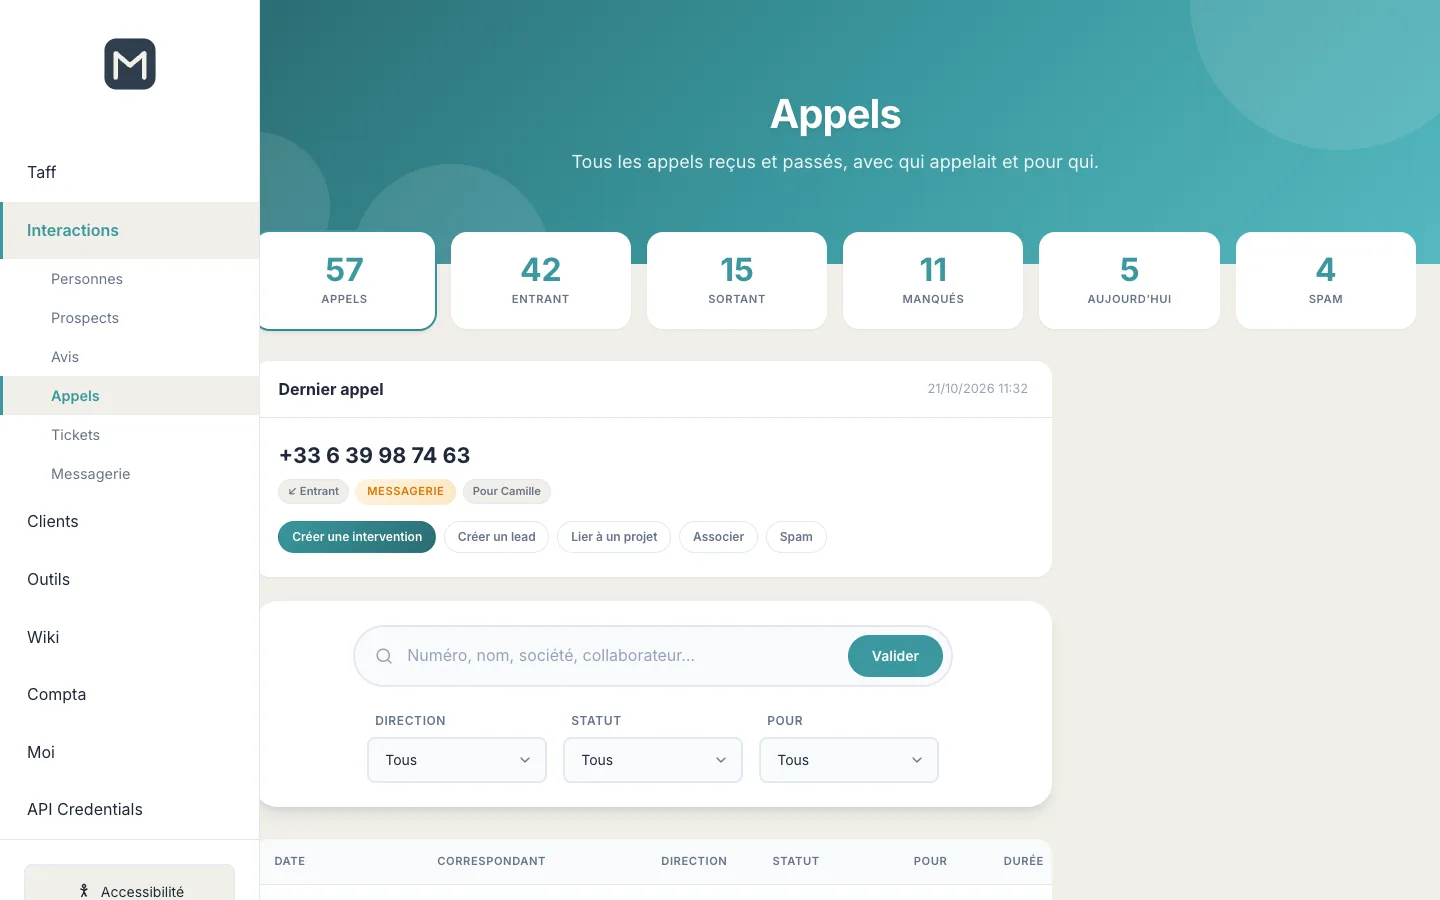
The Appels page lists all calls received and made on your lines, with who was calling and for whom. The most recent one is displayed large with the actions that usually follow a call.
The counters
- Appels (Calls): all calls, excluding spam. Click to remove all filters.
- Entrant (Incoming) and Sortant (Outgoing): calls received or made. Click to filter.
- Manqués (Missed): calls with the Manqué status. Click to filter.
- Aujourd’hui (Today): today's calls (this counter is not a filter).
- Spam: calls classified as spam. Click to display them.
Acting on the latest call
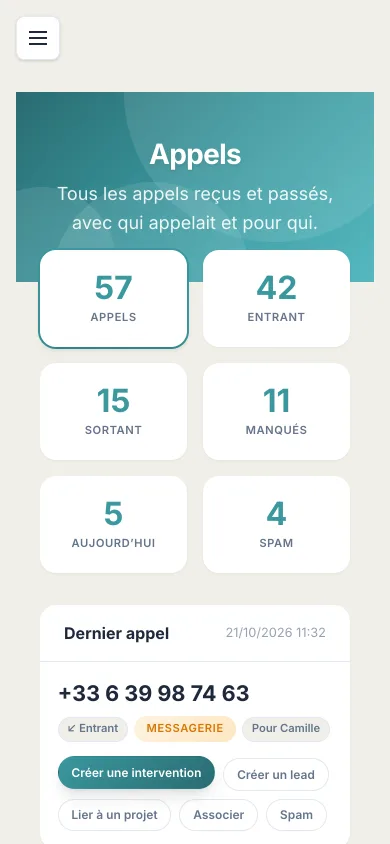
The Dernier appel card shows the caller's name if known (otherwise their number, or “Numéro masqué” (Hidden number)), their company, the direction of the call, its status, the colleague concerned (“Pour Camille” (For Camille)) and the links already created (project, intervention, lead). It only appears on the first page, with no filter or search.
- Créer une intervention (Create an intervention) opens the intervention form of the Work module, linked to this call.
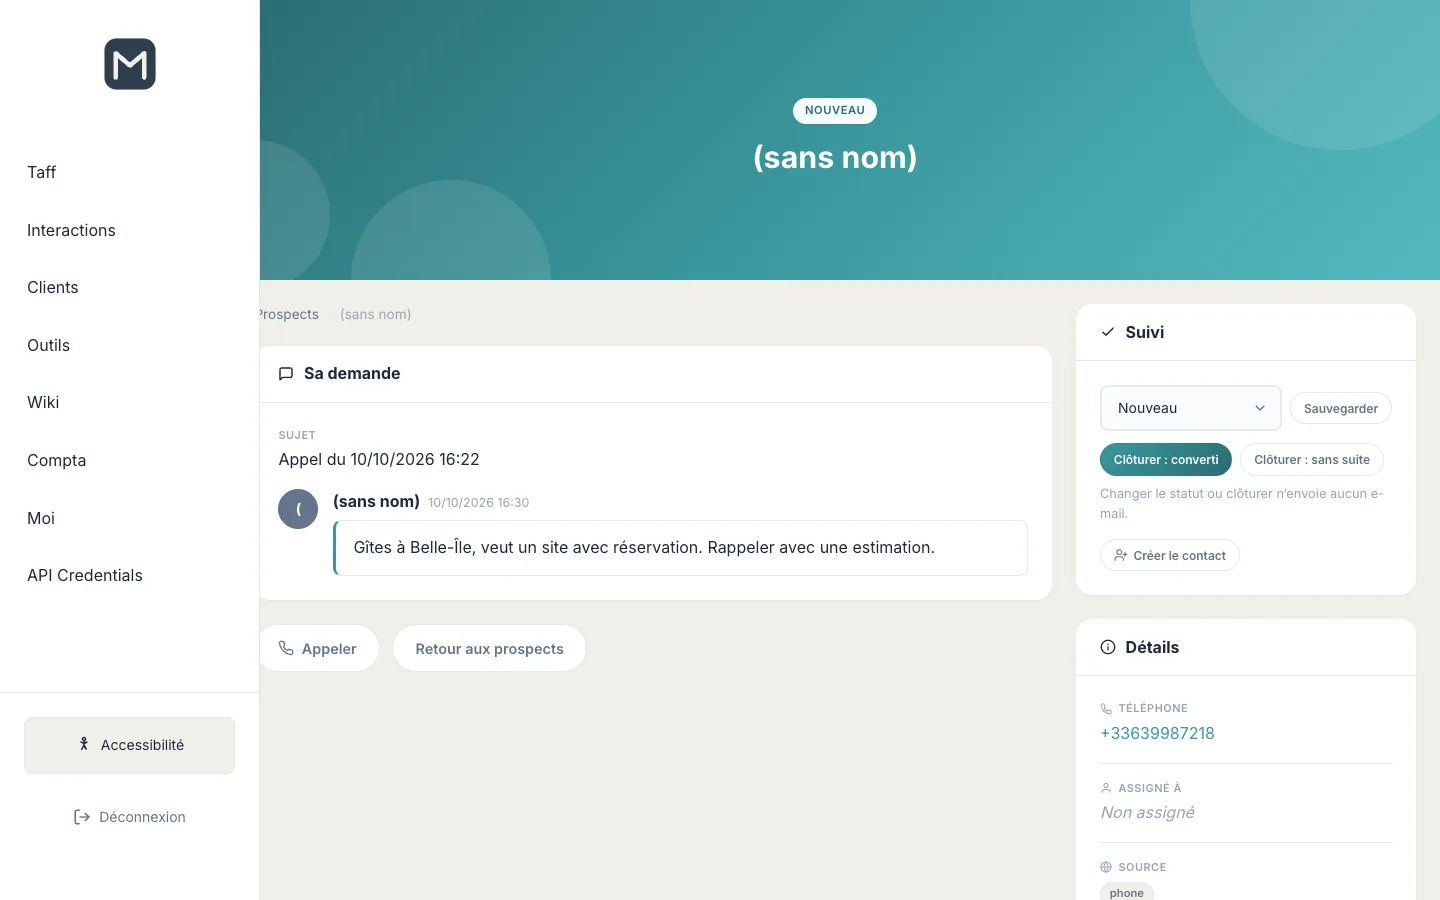
- Créer un lead (Create a lead) creates a prospect from the call: the caller's name and company, their number, a subject “Appel du dd/mm/yyyy hh:mm” (Call on) and your call notes. You land directly on the prospect's record. Once the lead has been created, the button becomes Voir le lead (View the lead). A call from a hidden number with no known email cannot become a lead.
- Lier à un projet (Link to a project) opens a search window across your projects (title or client): choose one then Lier (Link). The project is then shown under the caller.
- Associer (Associate) (or Contact if the caller is already known) links the number to a record: see below.
- Spam classifies the number as unwanted, after confirmation.
Associating an unknown number
When a number is not linked to anyone, it is shown on its own, in bold, in the list. Associate it once so that all subsequent calls show the name.
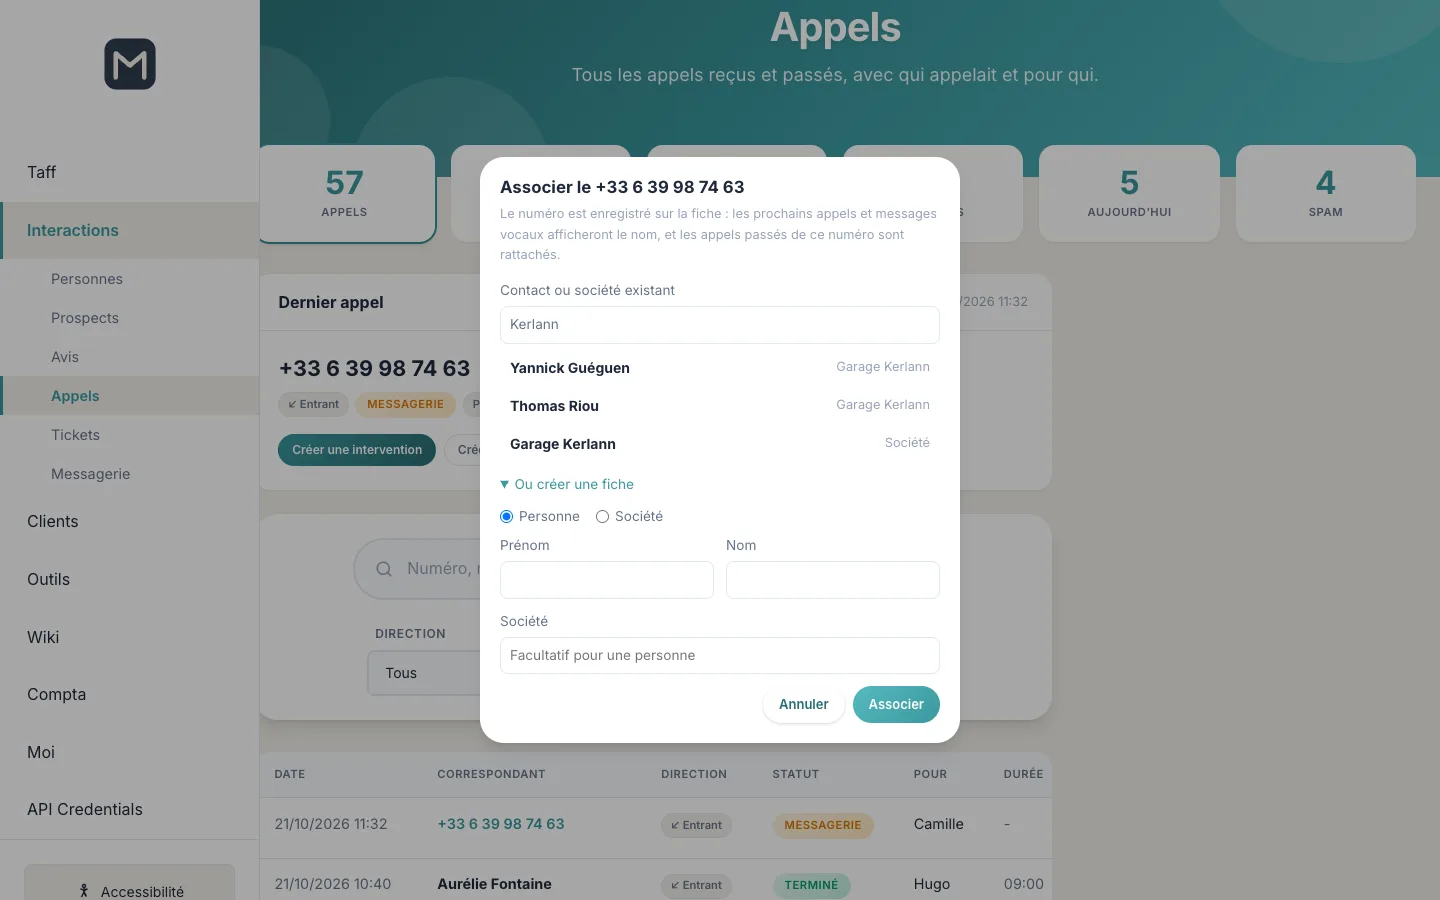
- Click Associer on the latest call card or on the call's row.
- In Contact ou société existant (Existing contact or company), type at least two letters of a name, a company or an email, then click the right result.
- If the person does not exist yet, open Ou créer une fiche (Or create a record), choose Personne (Person) or Société (Company), and fill in the first name and last name (and the company, optional for a person).
- Click Associer.
The number is saved on the contact's or company's record, and all past calls from that number are linked to it at once. For a hidden number, only the chosen call is linked.
The list and its filters
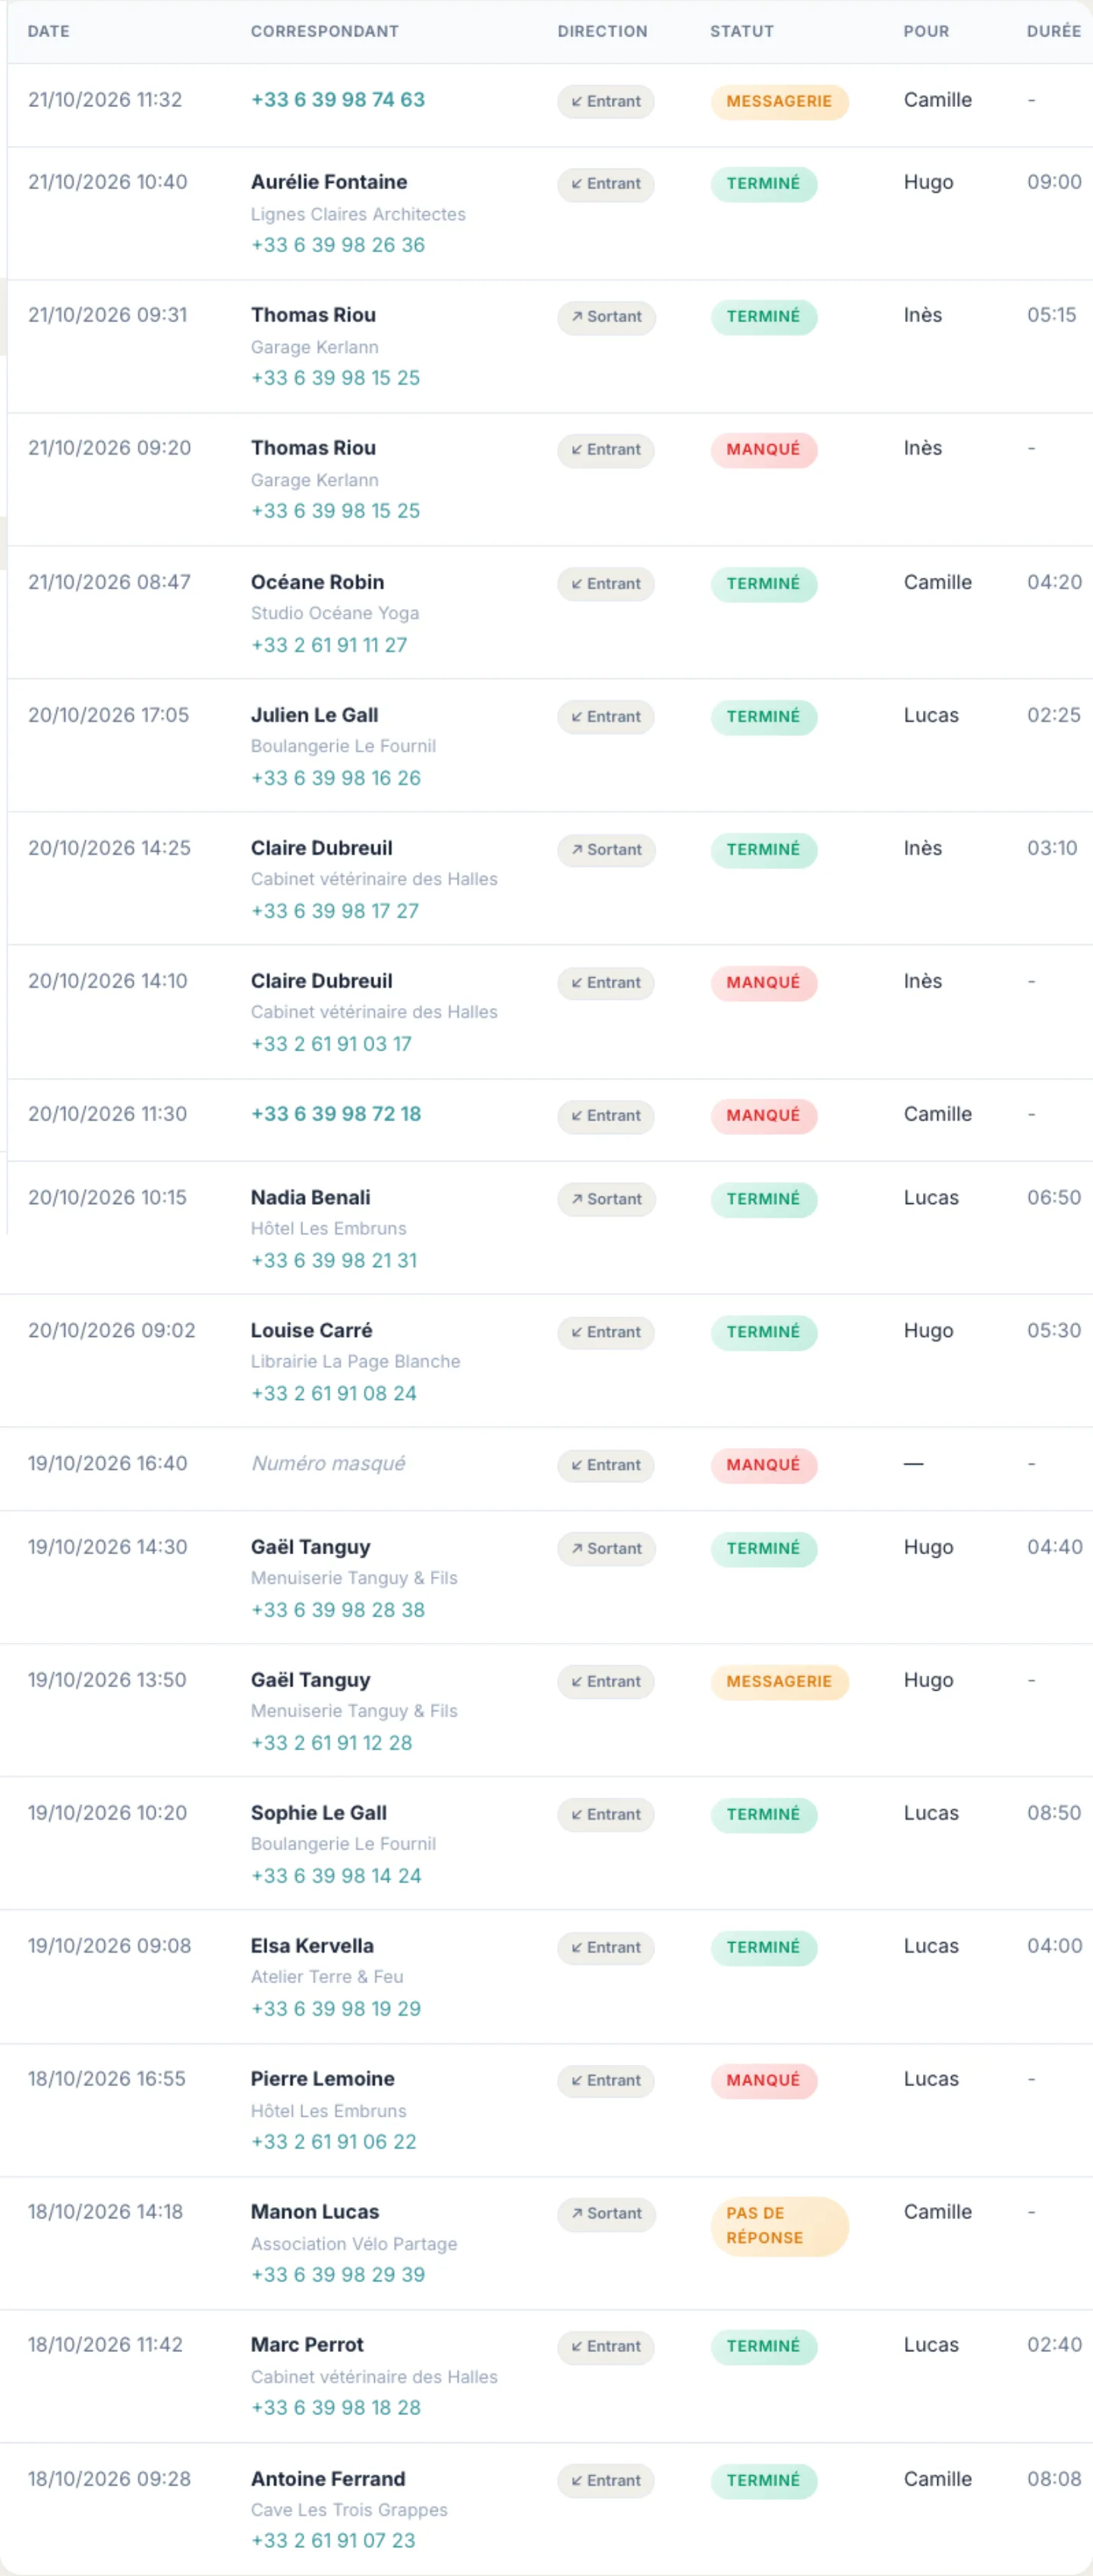
Each row shows the date and time, the caller (name, company, linked project and number), the Direction (Entrant or Sortant), the Statut, the colleague the call was Pour (For), the Durée (Duration) (mm:ss) and the Associer / Contact and Spam buttons.
Call statuses:
- Terminé (Completed): the call took place;
- Manqué (Missed): nobody picked up;
- Messagerie (Voicemail): the caller reached the voicemail;
- Occupé (Busy): the line was busy;
- Pas de réponse (No answer): your outgoing call did not get through.
- Type a number, a name, a company, a team member or a word from your notes in the search box, then Valider.
- Refine with the Direction, Statut and Pour (the colleague) lists. The change applies immediately.
- Move from one page to another at the bottom of the list: the filters are kept.
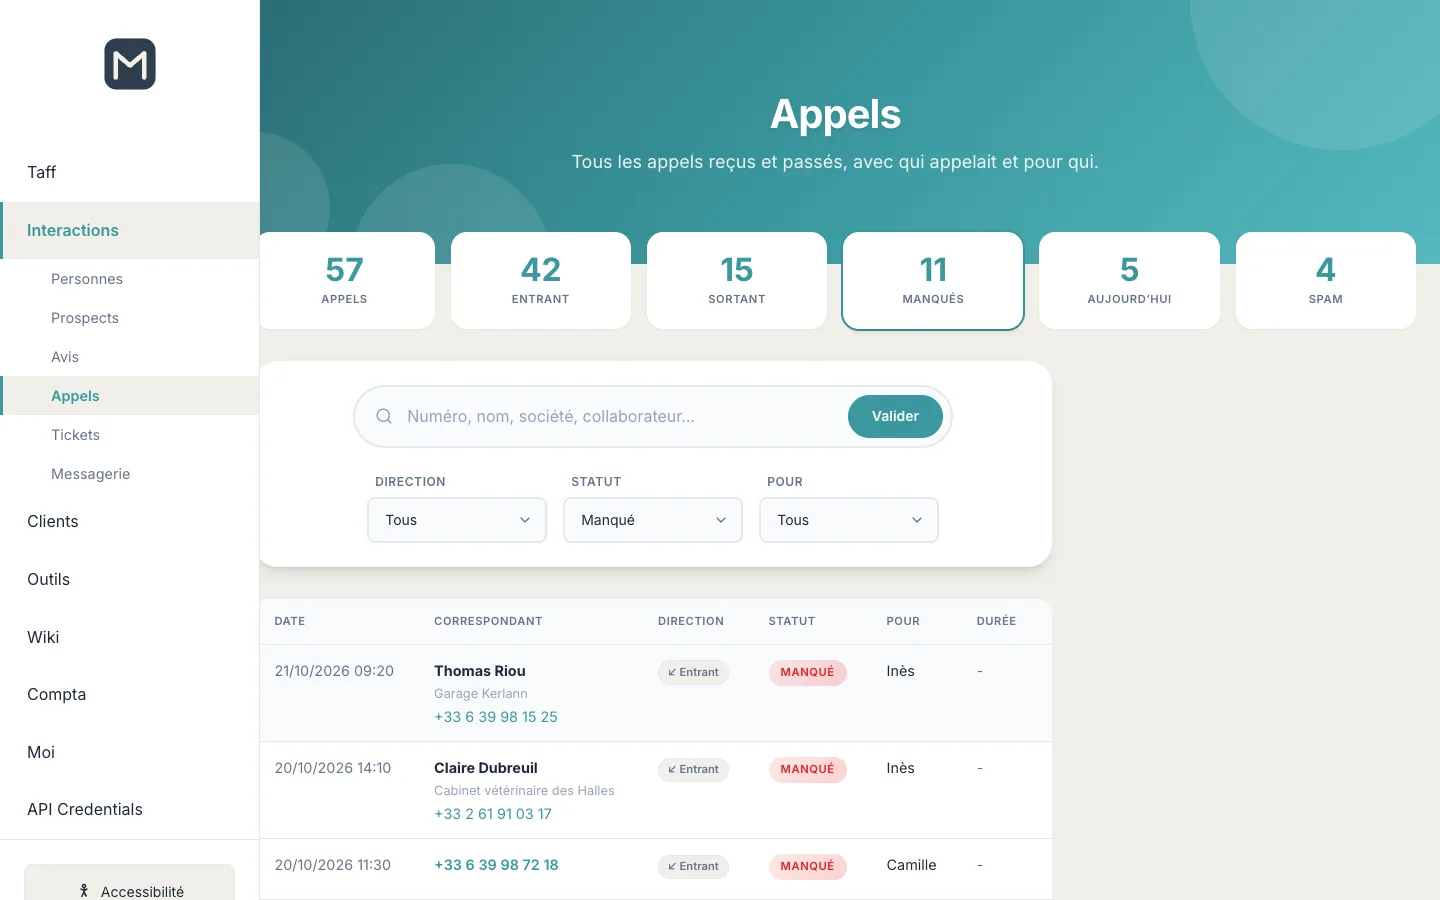
Tip: every morning, click the Manqués counter to see who to call back. The numbers displayed are clickable and start the call.
Spam
The Spam button on a call from an unknown number blacklists that number: all its calls, past and future, disappear from the list and the counters. On a call already linked to a contact, or from a hidden number, only that call is classified as spam.
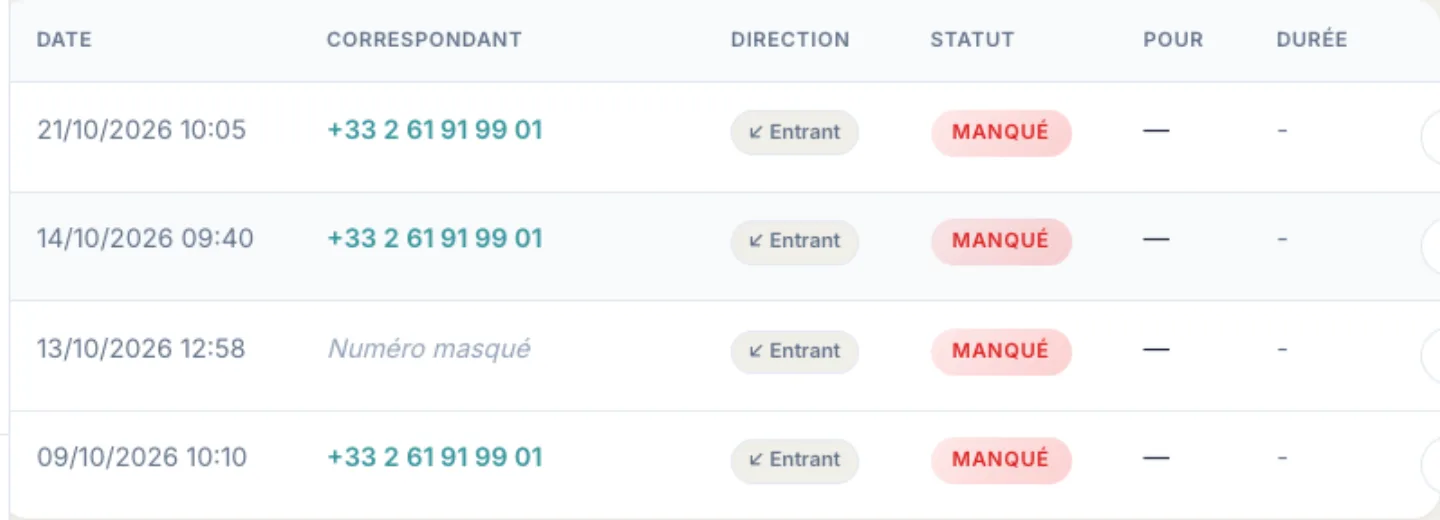
To undo, click the Spam counter, then Pas un spam on the relevant row: the number leaves the blacklist and all its calls come back.
On a phone
Managing tickets
The Tickets page gathers your clients' support requests. It is shared: the team sees the whole queue there, while each client only sees their own tickets.
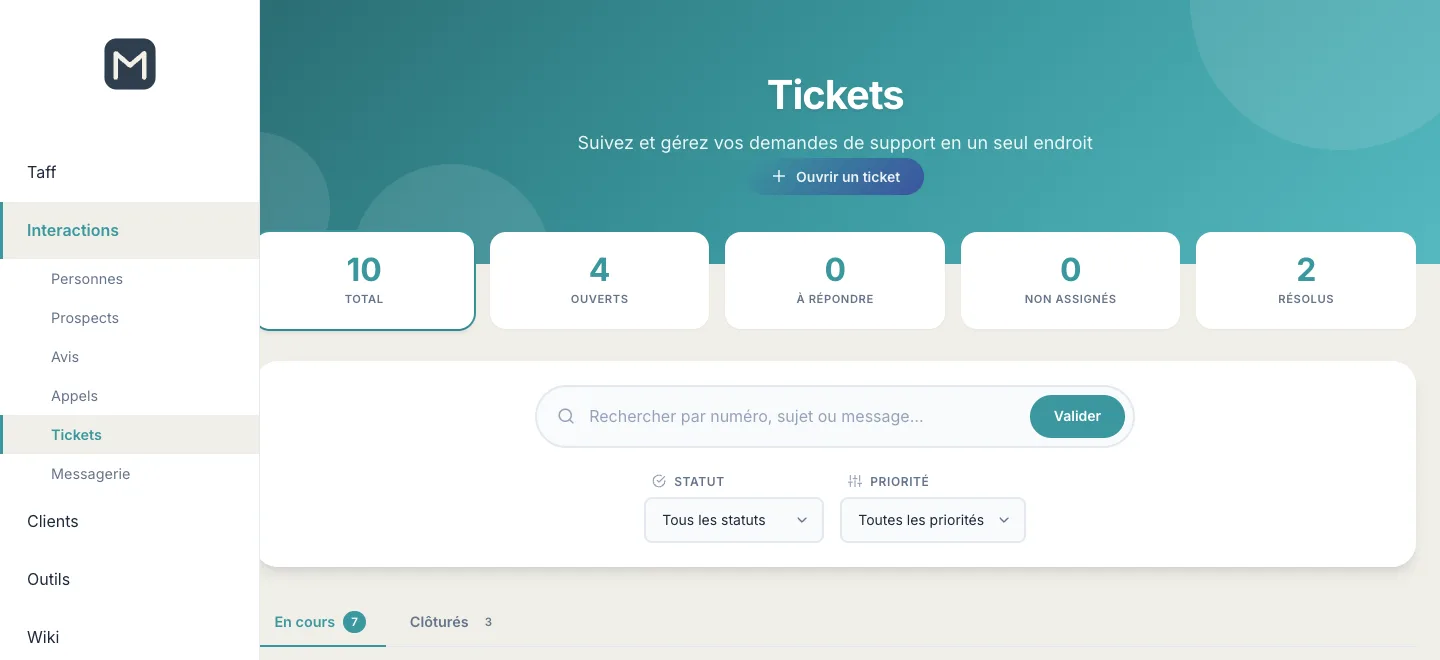
- Open Interactions › Tickets. The En cours (In progress) tab shows the tickets to handle; the Clôturés (Closed) tab shows resolved or closed tickets. The number of tickets is shown next to each tab.
- The Total, Ouverts (Open) and Résolus (Resolved) counters filter the list with one click. À répondre (To reply) counts the tickets waiting for a reply from your team and Non assignés (Unassigned) those that nobody has taken on (these two counters are calculated by the ticketing service when it is connected).
- Search by ticket number, subject or message, and filter by Statut or Priorité. Choosing a closed status automatically switches to the Clôturés tab.
- Click a ticket's subject to open it.
The table shows the ticket's age, its number (for example TKT-202610-00037), the subject with the start of the message, the brand or company, the assigned person, the number of replies and the status. Overdue or unassigned tickets are highlighted.
Statuses and priorities
- Ouvert (Open): the ticket has just arrived.
- En attente (Pending): you are waiting for information from the client.
- En cours (In progress): someone on the team is working on it.
- Résolu (Resolved): the solution has been provided.
- Fermé (Closed): the ticket is archived.
Priorities range from Basse (Low) to Normale (Normal), Haute (High) and Urgente (Urgent).
Reading and handling a ticket
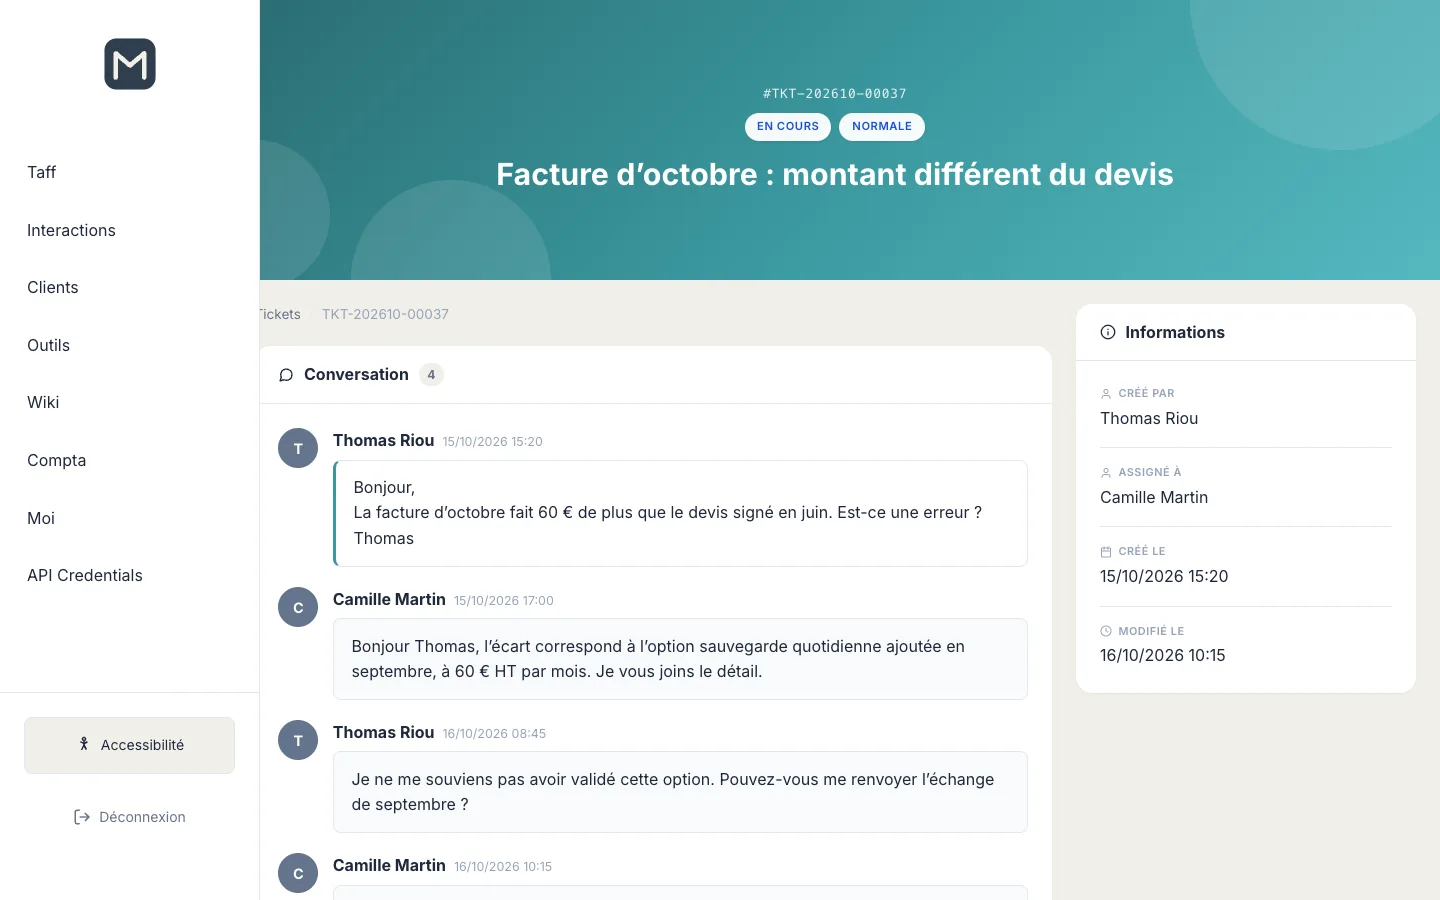
- At the top, the ticket's number, status, priority and subject.
- The Conversation block shows the original message then all the replies, in order, with their author and date. The team's internal notes do not appear there.
- The Informations panel shows who created the ticket, who it is assigned to, the company, and the creation and last modification dates.
- When the ticketing service is connected, the Répondre block under the conversation lets you write to the client; your reply is sent to them.
- Click Clôturer le ticket (Close the ticket) when the request has been dealt with. This button is offered to the team, to the assigned person and to whoever opened the ticket.
- If the request requires work on the client's site, Créer une intervention opens the intervention form of the Work module, pre-filled from this ticket.
The Ouvrir un ticket (Open a ticket) button, at the top of the list, lets a logged-in user create a request; it goes through the ticketing service.
Replying to messages with Oui Chat
The Messagerie page displays Oui Chat conversations in the hub: Messenger, Instagram, WhatsApp, SMS and your sites' messaging. Each team member replies under their own name.
- Open Interactions › Messagerie. The first time, the Connecter votre compte Oui Chat (Connect your Oui Chat account) panel is displayed.
- Enter the email and password of your Oui Chat account, then Connecter (Connect). The hub keeps a revocable access token, never your password.
- Once connected, the list of conversations is displayed on the left. Search for a conversation or filter on Toutes les conversations (All conversations), Non lues (Unread) or Archivées (Archived).
- Click a conversation to read its messages on the right. Write your reply in the field at the bottom: Entrée (Enter) sends, Maj (Shift) + Entrée starts a new line.
- Ouvrir Oui Chat (Open Oui Chat) opens the full application; Déconnecter mon compte (Disconnect my account) deletes the token from the hub.
Connecting your sources
Interactions does not make up its data: each screen is fed by a service that you connect once.
- Telephony (Appels page): your telephone provider notifies the hub at each stage of a call by calling a notification address on the hub, with the caller's number, the line called and the event (start, answered, end). The hub records the call, works out its status (completed, missed, voicemail, busy), matches the line called to the right colleague and looks up the caller in your contacts to display their name. The address to give your provider is provided to you at commissioning.
- Google Business Profile (Avis page): the plugin “Avis - Google Business Profile” must be enabled, then a Google account that manages your listings is connected in Connect, with the “Connecter un compte Google” (Connect a Google account) button. No key needs to be entered: you identify yourself with Google. A single agency account that manages all the listings is enough. Without an active source, the Avis page says so and explains what to enable.
- Email channels (tickets): each reception address of your agency (for example a support address and a quotes address) is declared as a channel, with its queue folder, the address replies are sent from, the default priority and assigned person, the target first-response time and the automatic acknowledgement of receipt. Incoming emails are sorted (duplicates, automatic replies and bulk mailings are discarded), linked to the right channel, then become a new ticket or a reply to an existing ticket.
- Ticketing service, leads and Oui Chat: their credentials are entered in Connect or in the options of the Interactions component. Your sites' forms can thus feed the prospects, and tickets can be shared between your different brands.
Frequently asked questions
I cannot see the Prospects, Appels or Avis menu.
These pages are reserved for the team. Ask an administrator to give you the management permission on the Interactions component.
A call only shows a number. How do I see the name?
Click Associer and choose or create the record. All calls from that number, past and future, will then show the name.
I classified a number as spam by mistake.
Click the Spam counter, then Pas un spam on the call's row. The number leaves the blacklist and its calls come back into the list.
Is the prospect notified when I change their status?
No. Changing the status or closing an enquiry does not send any email. Only “Répondre par e-mail” and “Appeler” put you in contact with them.
Is my reply to a review published straight away?
It is sent to Google as soon as you click Publier la réponse. If Google puts it into moderation, its state is shown next to the date of the reply.
Why does a review carry the note “Avis modifié depuis la réponse”?
The author rewrote their review after your reply. Read it again: your reply may no longer match what they now say.
Can my clients see other clients' tickets?
No. A client only sees their own tickets and, when the ticketing service is connected, those of their company. Only the team sees the whole queue.