
Humans is the “people” module of Contexte. It brings together in one place the contacts and companies you work with, your team's attendance and leave, your profile, and the space where your clients find their tickets, their invoices and their company information.
Two audiences use it:
- the staff of your organisation: they keep their attendance calendar, book their leave and update their profile; partners also manage contacts and companies;
- your clients: they log in to their own dashboard, edit their profile and, if they have the right to, their company information and their invoices.
The examples in this guide come from a demonstration instance: the fictional web agency Maison Ardoise, in Nantes, and its clients.
Installation
Humans is part of Contexte: it is installed with your instance, so there is nothing to add. To set up an instance, follow the guide Install my Hub instance.
Access and permissions
What you see in the menu depends on your account's group.
- Collaborateurs (Staff): the Moi (Me) menu, with Mes jours de congés (My leave days) and Mes jours de présence (My attendance days). Only people linked to a contact record in your organisation have an attendance calendar.
- Associés (Partners): in addition, Interactions › Personnes (the contacts) and Clients › Entreprises.
- Super Users: in addition, Compta › Factures impayées (Unpaid invoices) and Factures fournisseurs (Supplier invoices). A Super User also sees the leave of the whole team.
- Clients: Tableau de bord (Dashboard), Administratif (Devis & Factures, Informations de l'entreprise) and Moi.
On the client side, three settings on the contact record decide what they see:
- Accès complet à l'entreprise (Full company access): the client sees all the tickets of their company on their dashboard, and not only those they created;
- Accès aux départements (Department access) (Développement Web, Marketing, Gestion de projet, Facturation): the Facturation (Billing) department opens the Devis & Factures page;
- the Informations de l'entreprise page is open to the person who created the company and to members of the department groups (Billing, marketing, web, project).
Contacts
The Interactions › Personnes page lists all registered people: your staff as well as your clients' contacts. At the top, two counters give the number of contacts and companies.
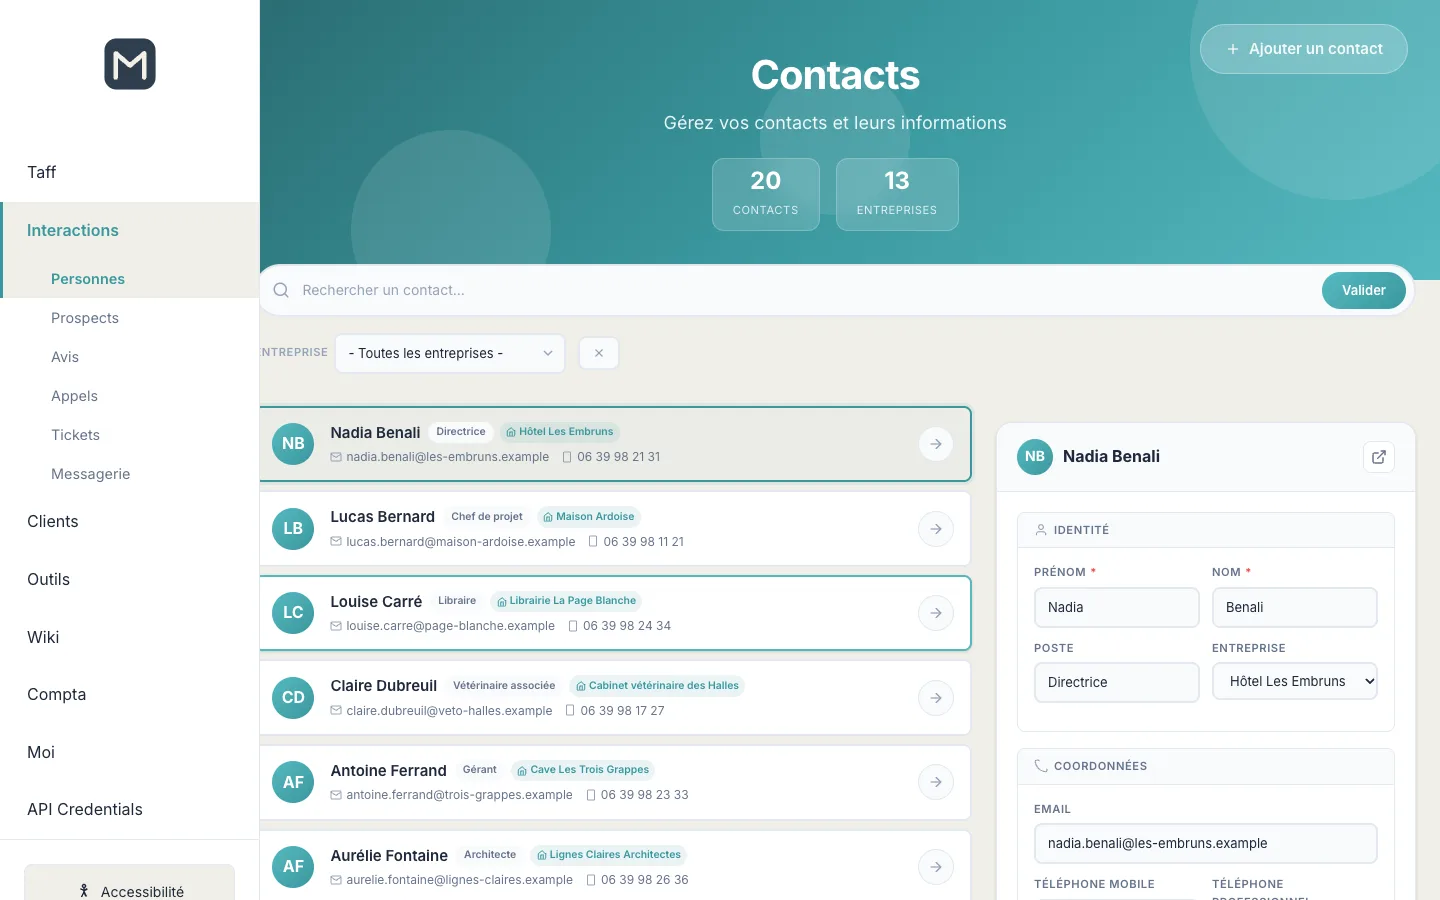
Each row shows the initials, name, job title, company, email address and mobile phone.
- Type a name in Rechercher un contact… (Search for a contact…) then click Valider (Submit).
- To see only a client's contacts, choose it in the Entreprise list. The × button clears the filters.
- Click a row: the panel on the right shows its information (identity, contact details, social networks, biography and tags). Edit it then click Enregistrer (Save): the change is saved without leaving the list. Annuler (Cancel) discards your changes.
- To add a person, click Ajouter un contact (Add a contact).
Tip: the arrow at the end of each row, or the icon at the top of the panel, opens the contact's full record.
A contact's record
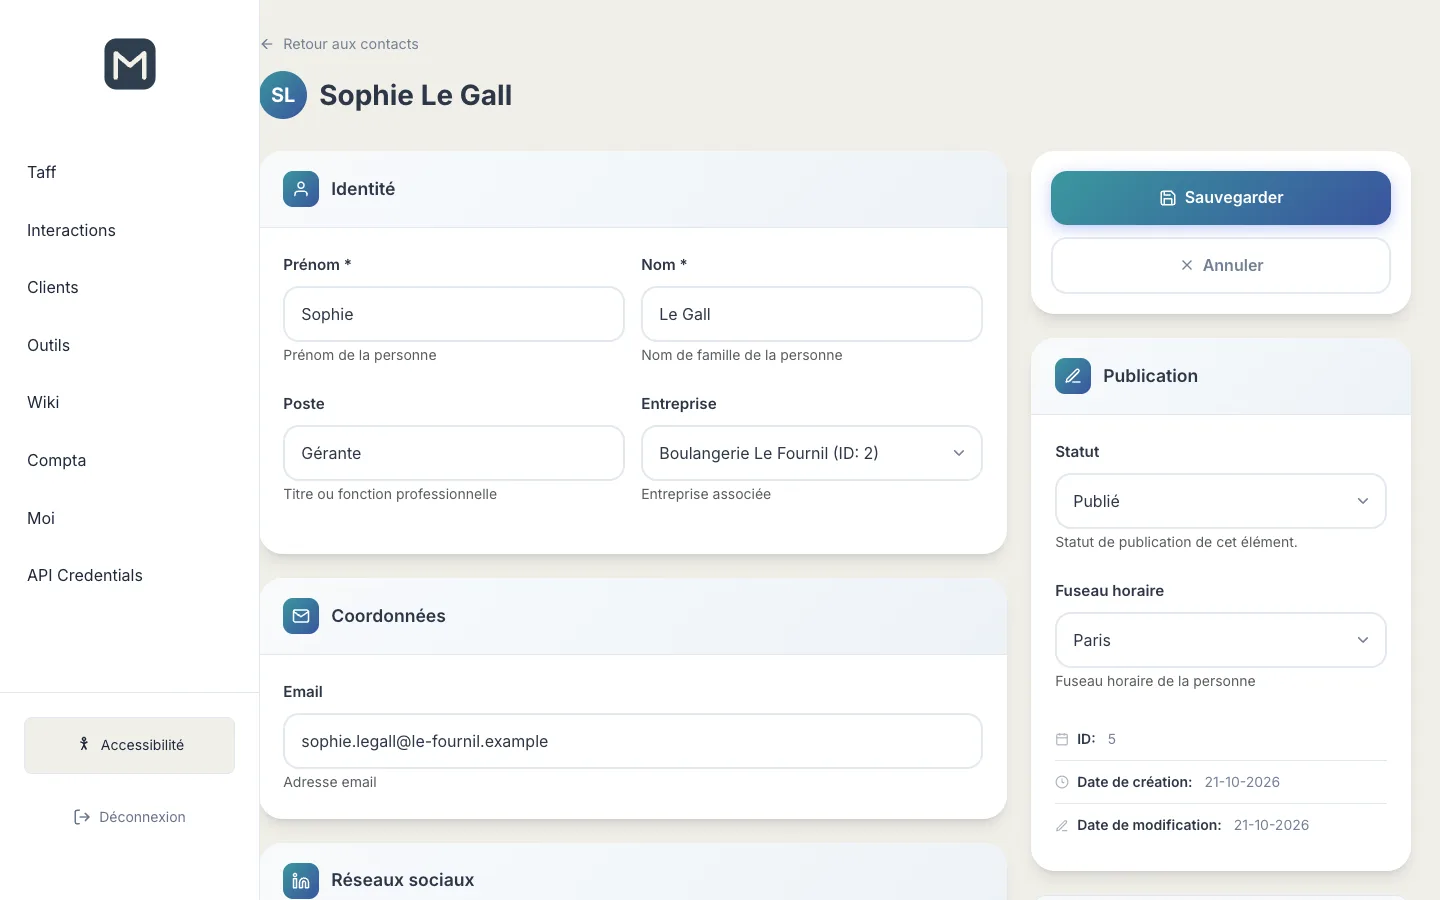
The full record contains the same information, organised in blocks:
- Identité (Identity): first name, last name, job title and company;
- Coordonnées (Contact details): email address;
- Réseaux sociaux (Social networks): LinkedIn and Twitter profiles;
- À propos (About): biography and tags (separated by commas);
- Accès & Permissions (Access & Permissions): the user account linked to the contact, full company access and department access (see the Access and permissions section);
- Publication, on the right: the status (published or not), the time zone and the creation and modification dates.
Click Sauvegarder (Save) to save, or Annuler to return to the list.
Companies
The Clients › Entreprises page lists your clients and partners in alphabetical order.
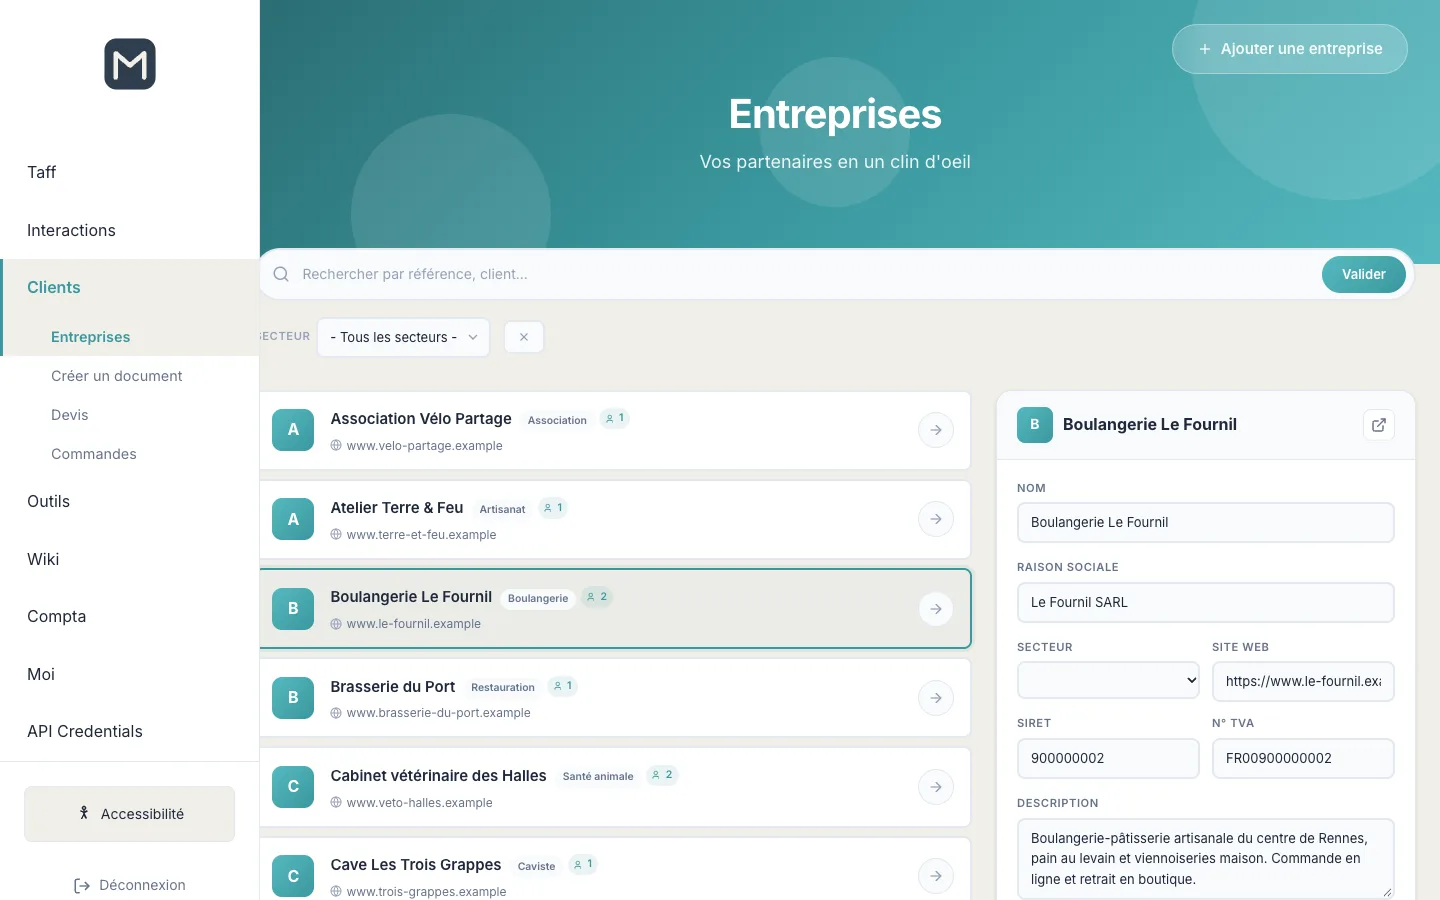
Each row shows the name, sector, website and number of linked contacts.
- Look for a company in the search bar, then click Valider.
- Filter by Secteur (Sector): the list offers the sectors already entered on your companies.
- Click a row to edit, in the panel on the right, the name, legal name, sector, website, SIRET, VAT number and description.
- To create a company, click Ajouter une entreprise (Add a company).
A company's record
The arrow on a row opens the company's record: everything you know about a client on a single page.
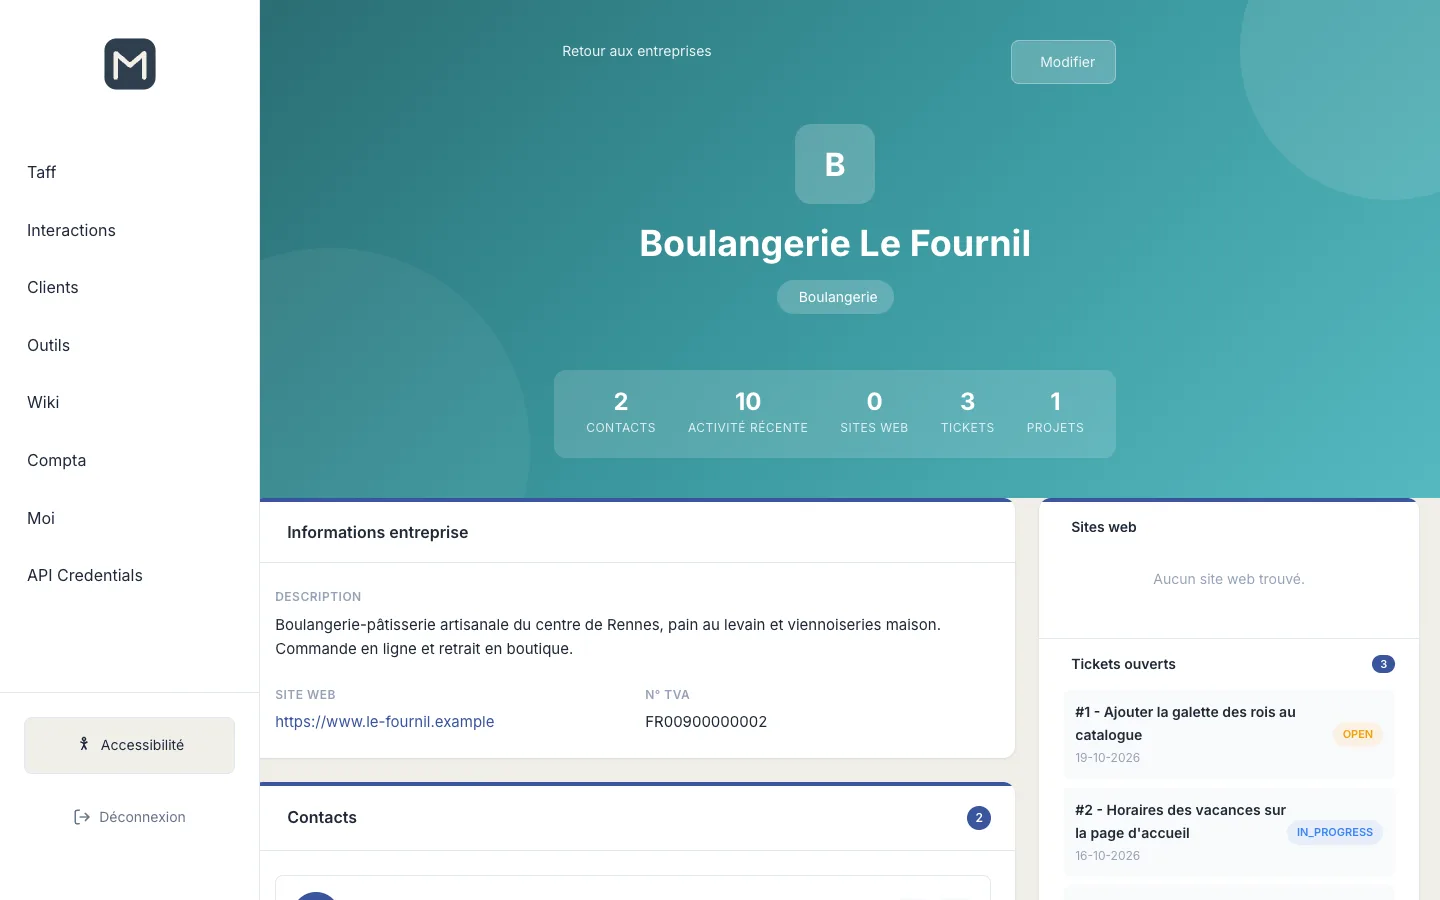
- The header shows the name, the sector and five counters: Contacts, Activité récente (Recent activity), Sites web (Websites), Tickets and Projets (Projects).
- Informations entreprise (Company information): description, website and VAT number.
- Contacts: the people linked to the company.
- On the right: the websites monitored for this client, their open tickets and their active projects.
- The Modifier (Edit) button opens the company form; Retour aux entreprises (Back to companies) returns to the list.
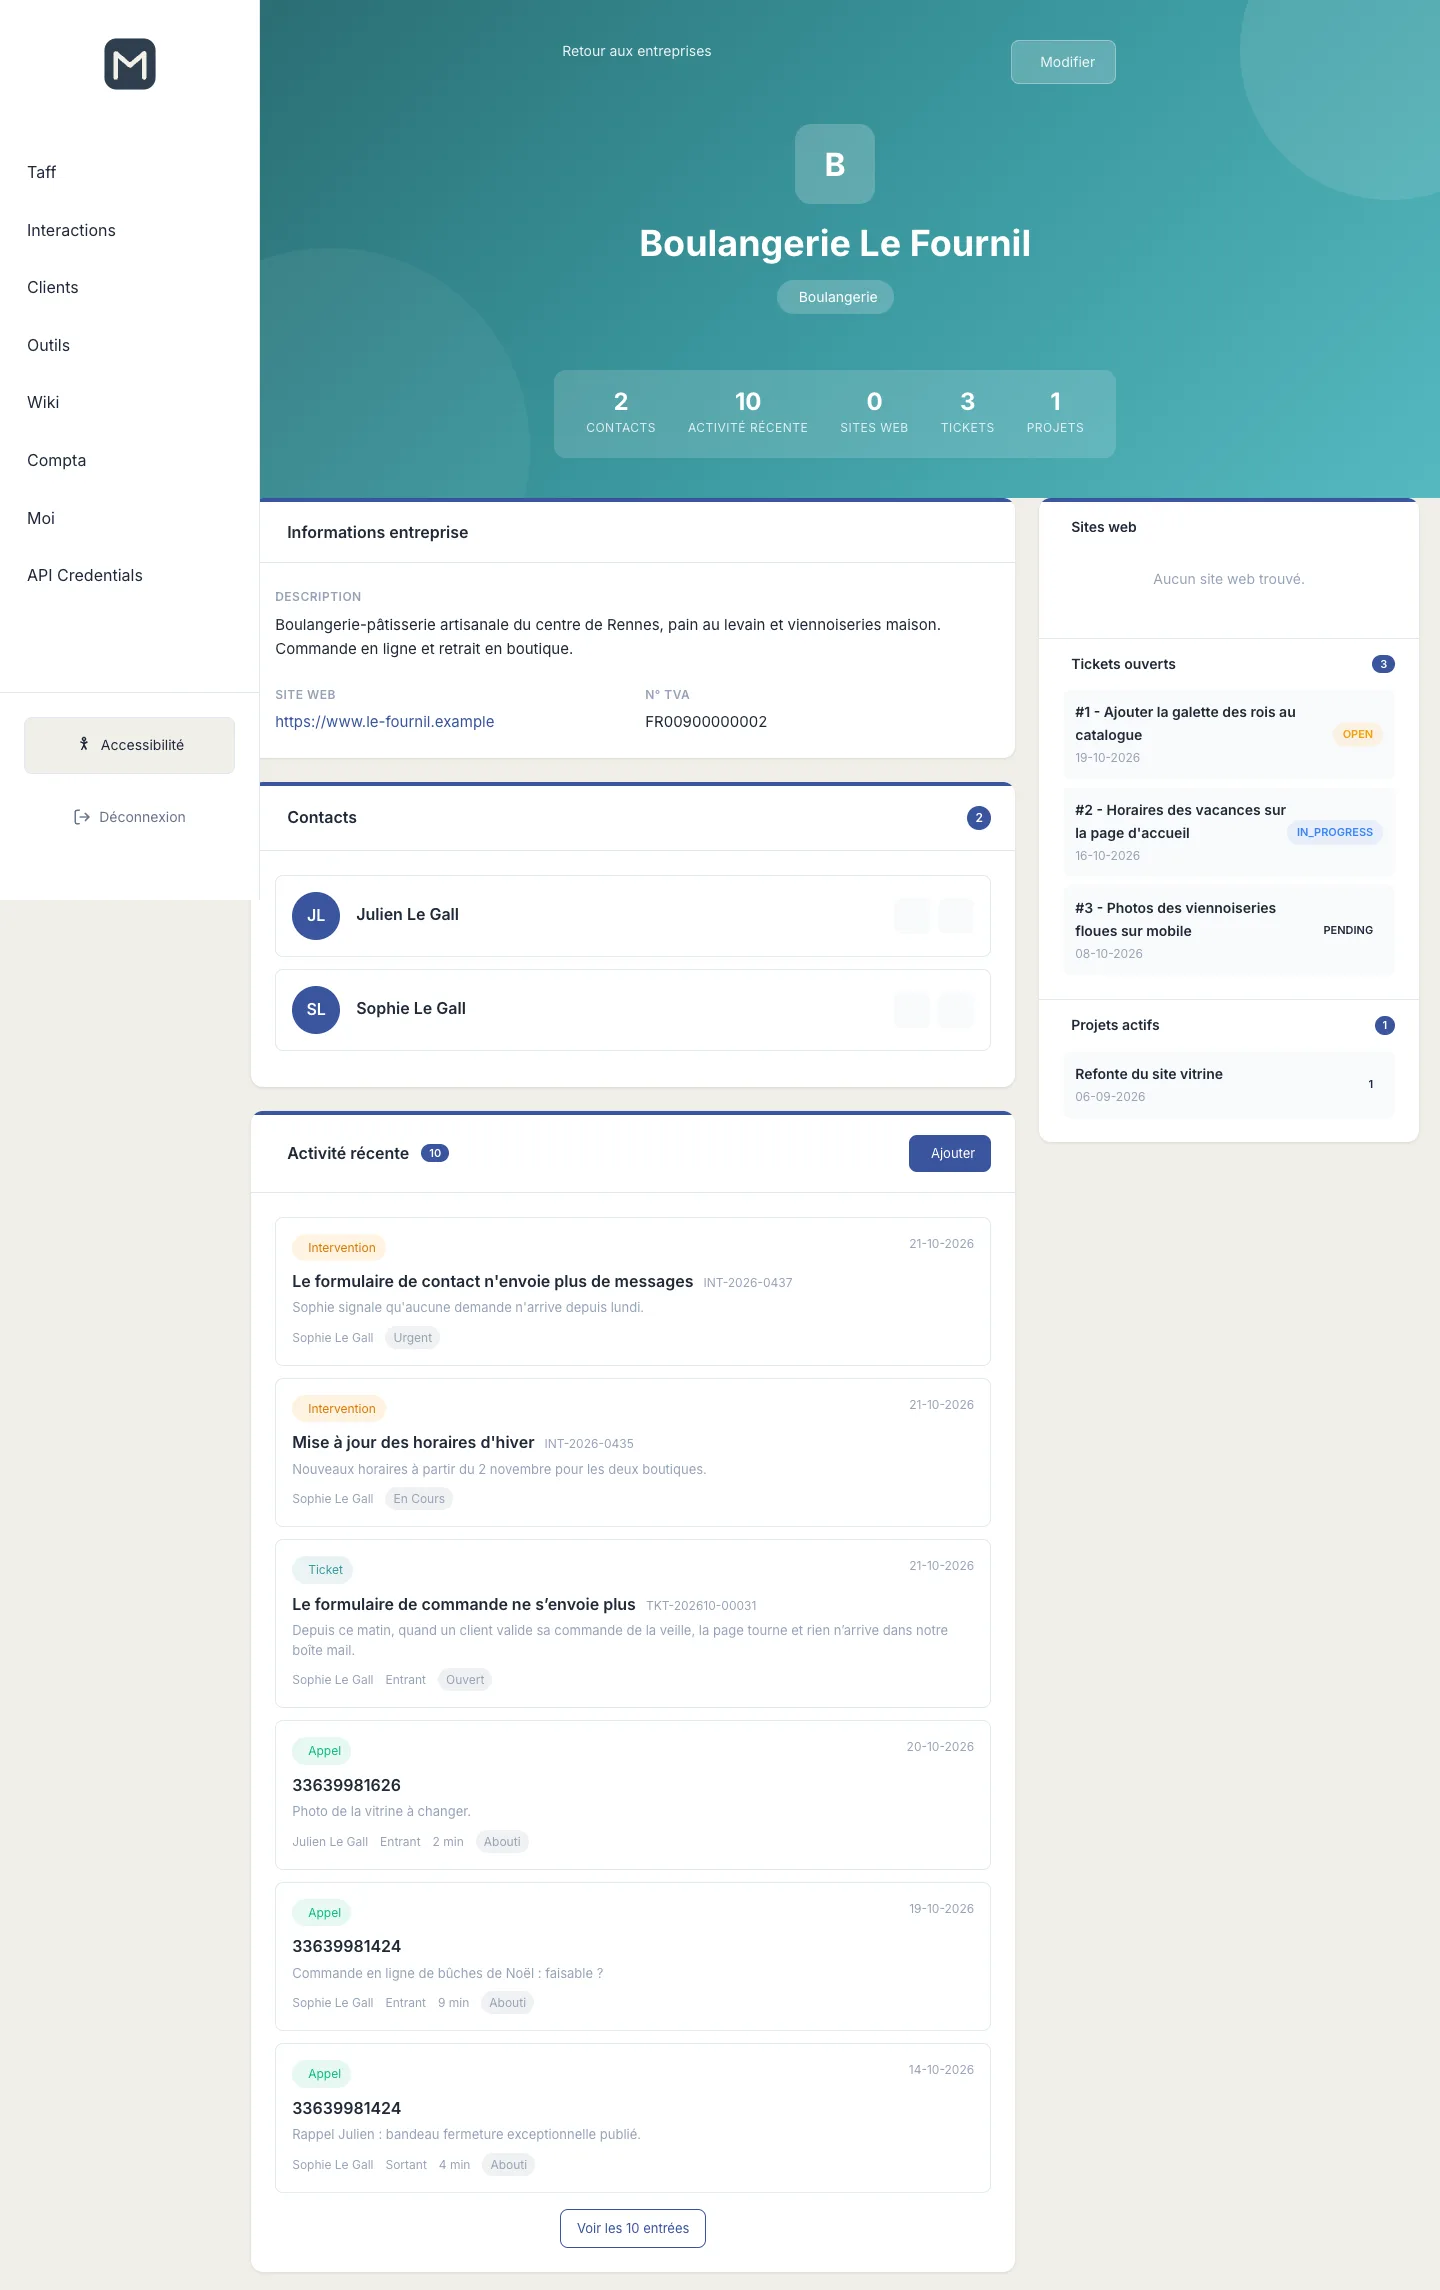
The Activité récente block gathers, from newest to oldest, what has happened with this client in the other Contexte modules: interventions, tickets, calls. Each entry shows its type, date, the person concerned and its status. The Voir les … entrées (View all … entries) button expands the full list.
Further down, the Propositions (Proposals) block lists the deliverables submitted to the client for approval in their projects, with their status (for example En attente (Pending)).
Your profile (Moi)
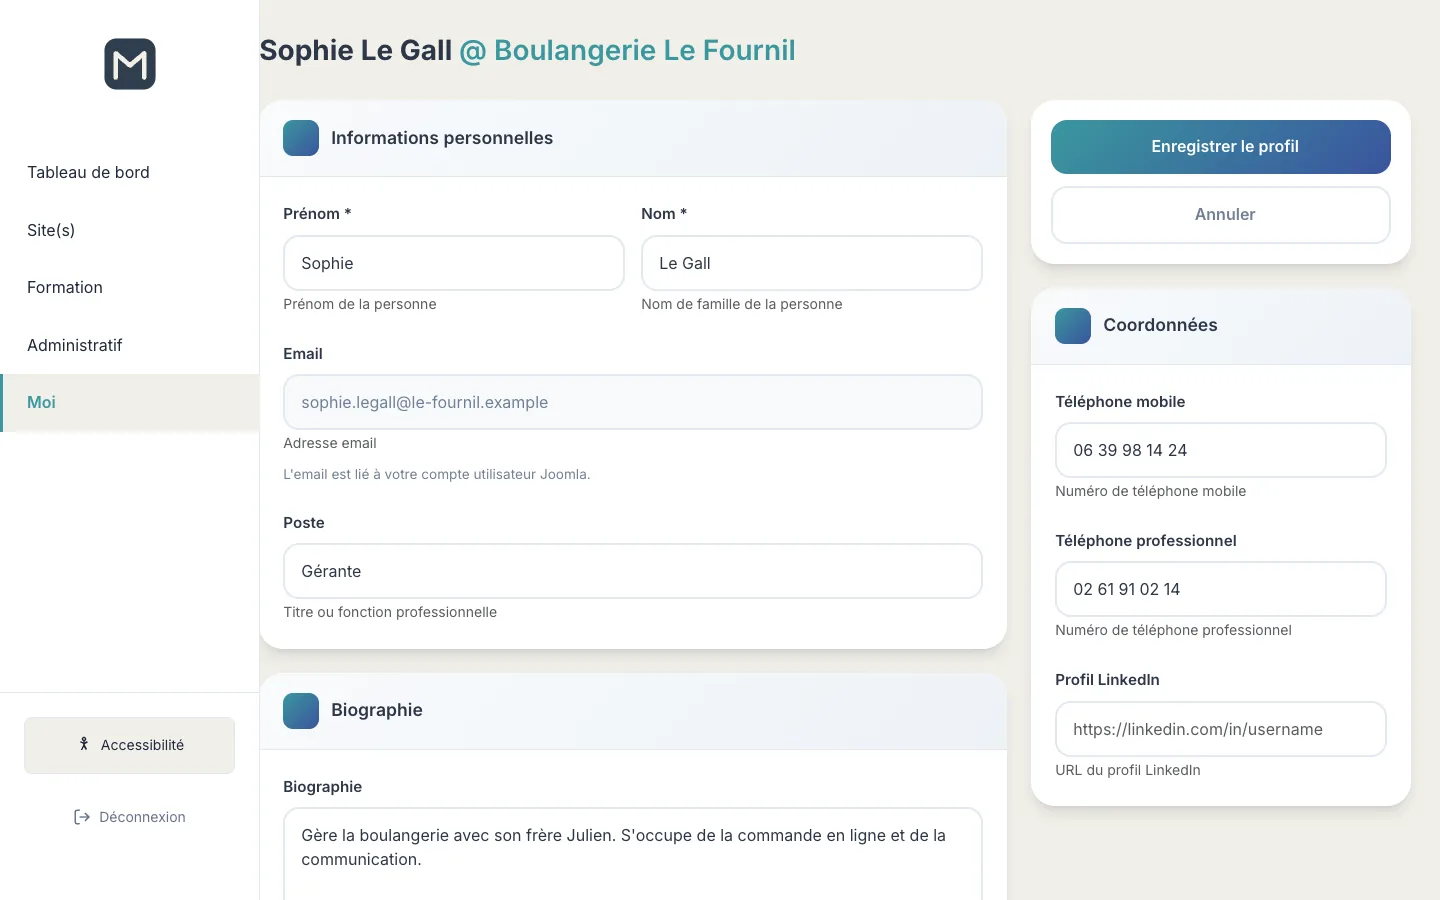
The Moi menu opens your profile. The title shows your name and your company.
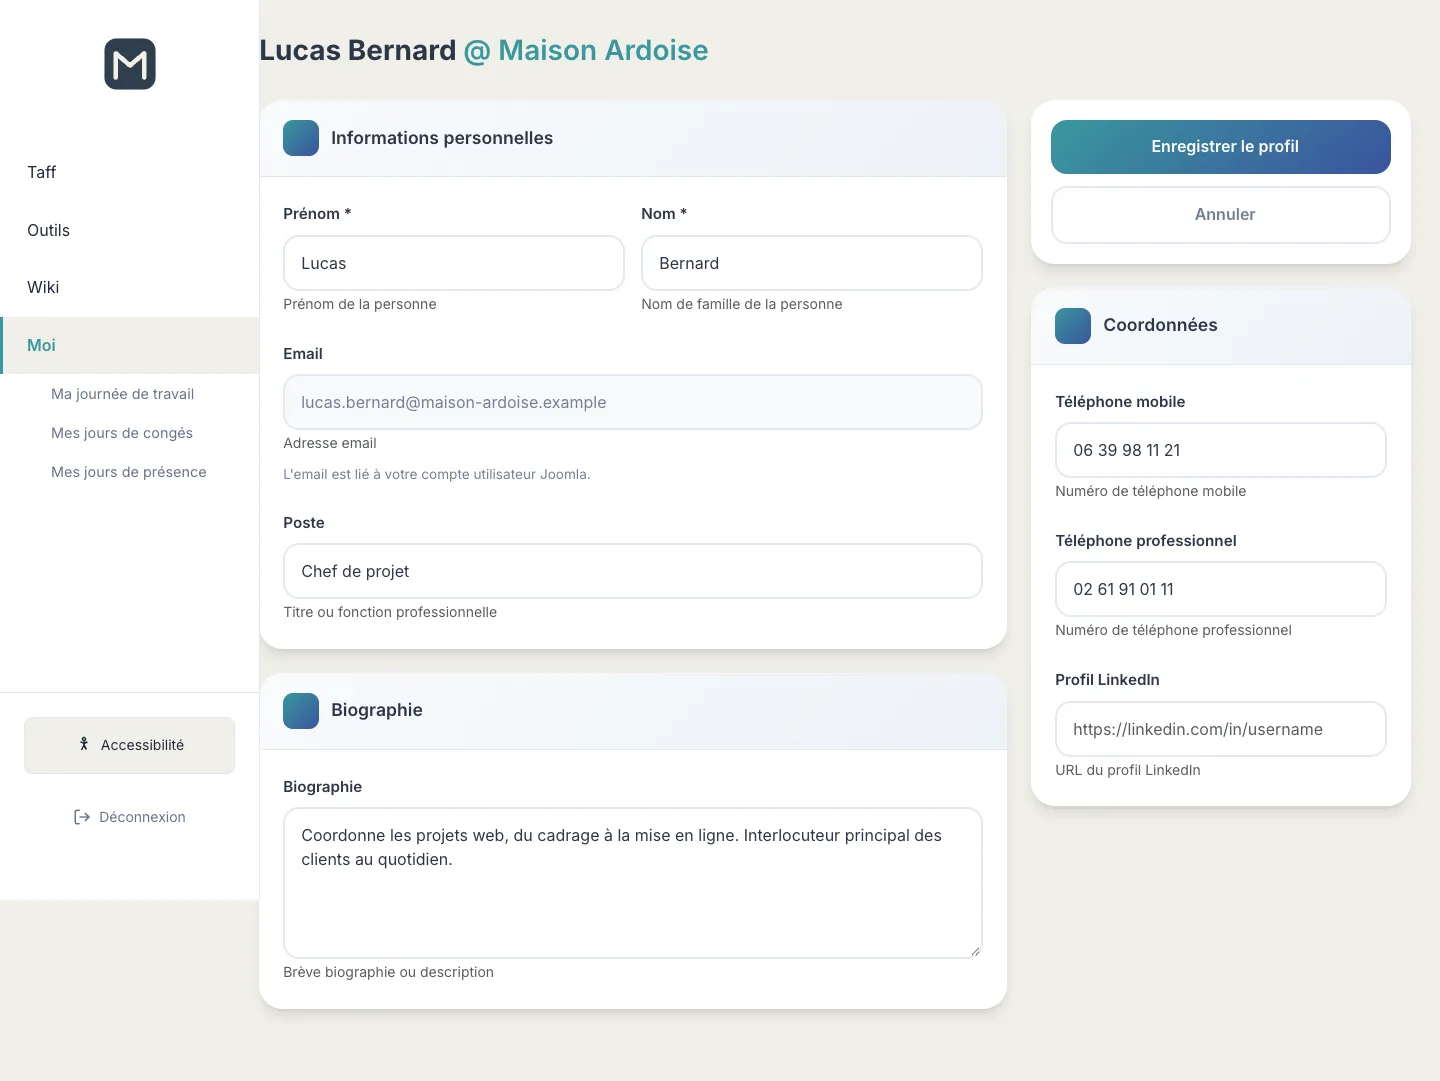
- Edit your personal information: first name, last name and job title.
- Complete your contact details: mobile phone, work phone and LinkedIn profile.
- Write a few lines in Biographie (Biography).
- Click Enregistrer le profil (Save profile). Annuler takes you back to the home page without changing anything.
Your email address is greyed out: it is tied to your login account and cannot be changed here.
Depending on your permissions, two additional blocks appear on the right:
- Gestion de l'entreprise (Company management), with the Gérer l'entreprise (Manage company) button, which opens the Informations de l'entreprise page;
- Jeton API (API token), with the Générer un jeton (Generate a token) button, to authenticate requests to the Contexte API. Keep this token to yourself: it gives access to your data.
Mes jours de présence
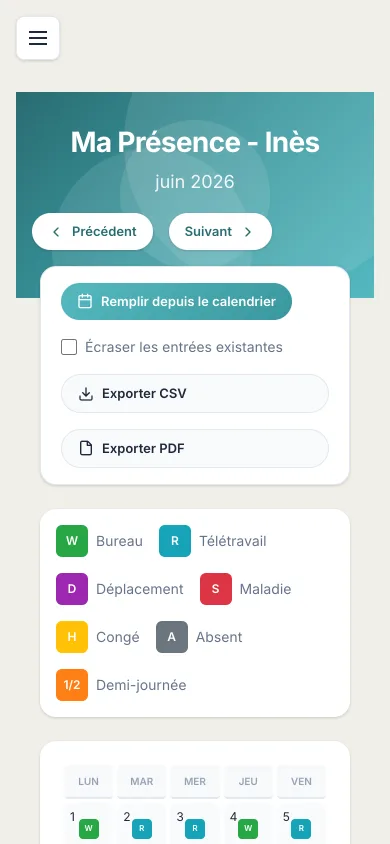
Moi › Mes jours de présence shows your calendar for the month: one box per working day, Monday to Friday. You record there where you worked each day.
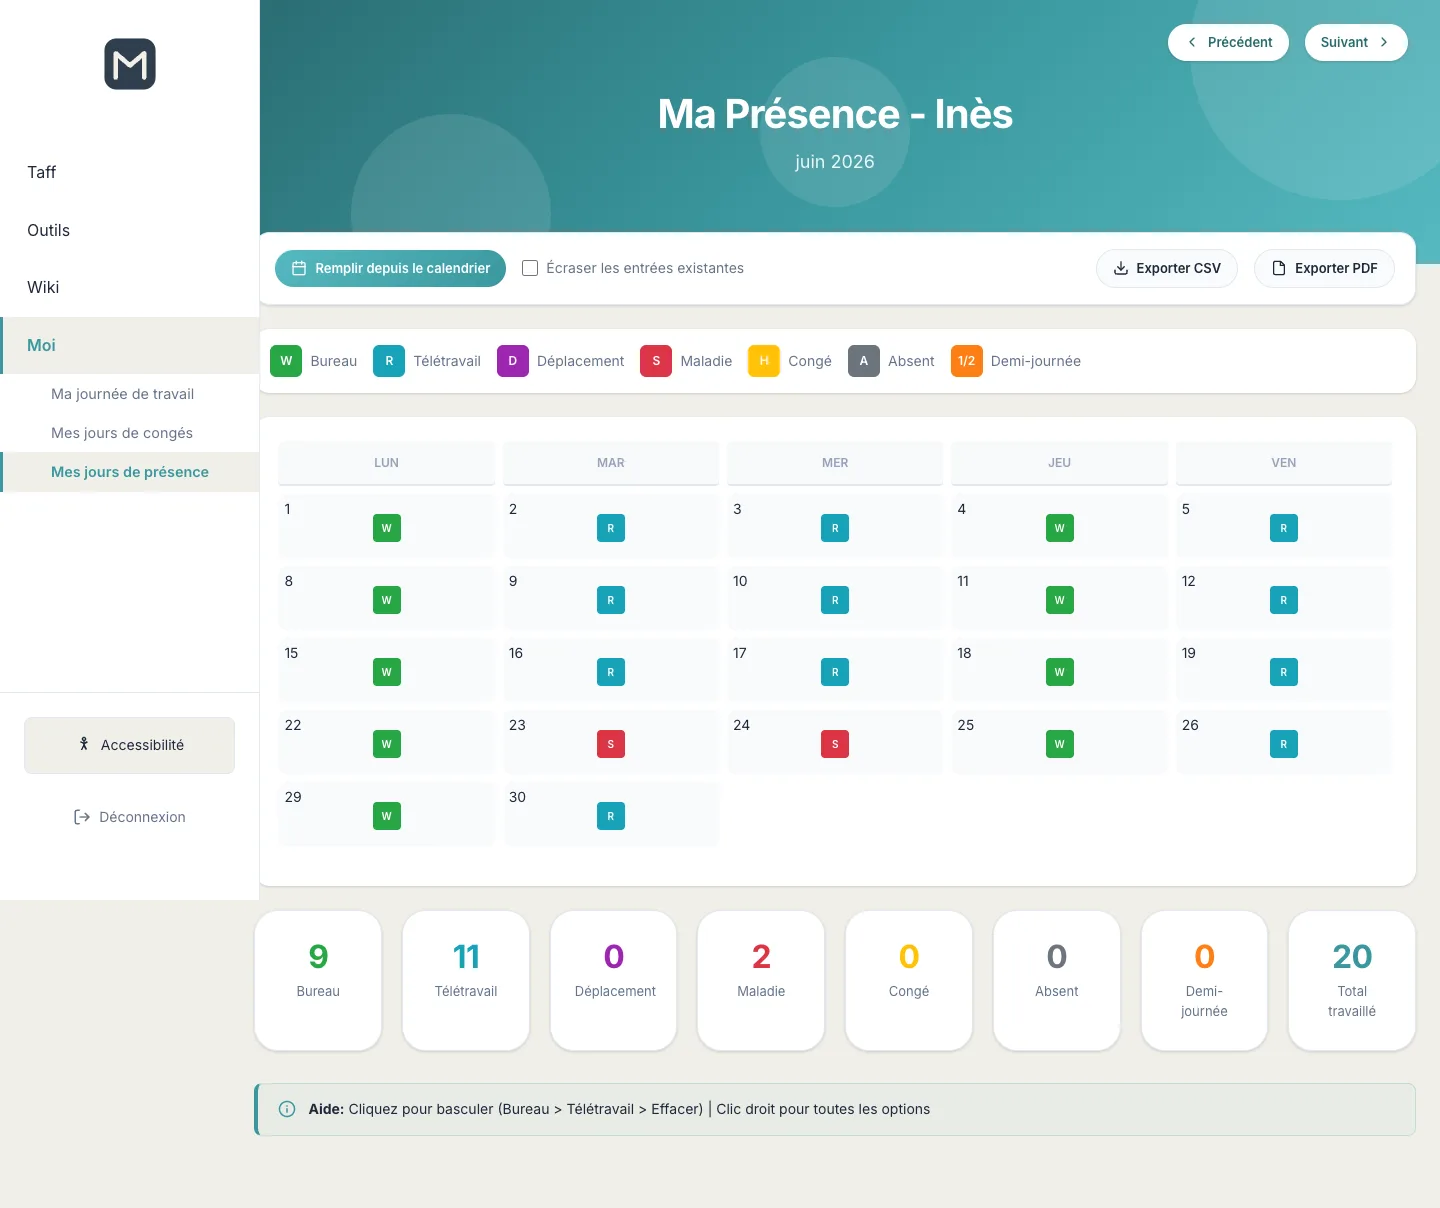
Seven statuses are possible, each with its letter and colour:
- W – Bureau (Office): a day worked on site;
- R – Télétravail (Remote work): a day worked remotely;
- D – Déplacement (Travel): a day at a client's, in training or at an external meeting;
- S – Maladie (Sick): sick leave;
- H – Congé (Leave): a day of leave;
- A – Absent: other absence;
- 1/2 – Demi-journée (Half day): a half day worked.
Filling in the calendar
- Click an empty box: it changes to Bureau. A second click changes it to Télétravail, a third clears it.
- For any other status, right-click the box and choose from the list. × Effacer (Clear) empties the box.
- Each change is saved immediately, and the totals under the calendar are updated.
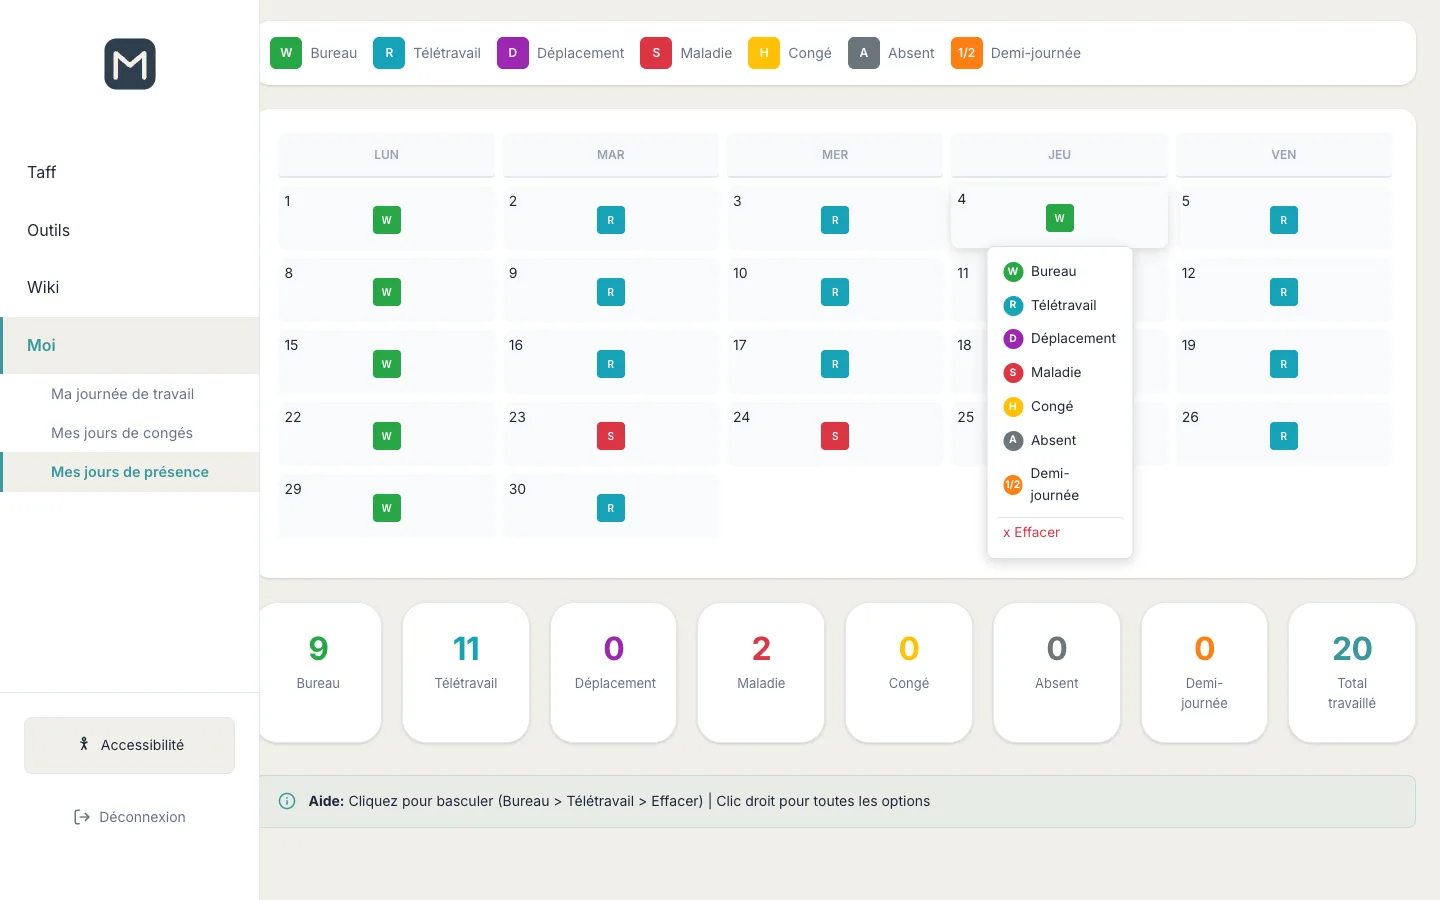
Under the calendar, there is a counter for each status and the Total travaillé (Total worked): days at the office, working remotely and travelling count as one day, a half day as 0.5.
The other buttons
- Précédent (Previous) and Suivant (Next) change the month.
- Remplir depuis le calendrier (Fill from calendar) pre-fills the month from your Google calendar: each working day becomes Bureau, except days when an event contains “Formation” (or “Greta”), which become Déplacement. Days already filled in are kept, unless you tick Écraser les entrées existantes (Overwrite existing entries).
- Exporter CSV and Exporter PDF download the statement for the month displayed.
Tip: on a phone, the page is displayed in a single column; the calendar keeps its five columns from Monday to Friday.
Mes jours de congés
Your leave list gathers all your requests, from the furthest in the future to the oldest.
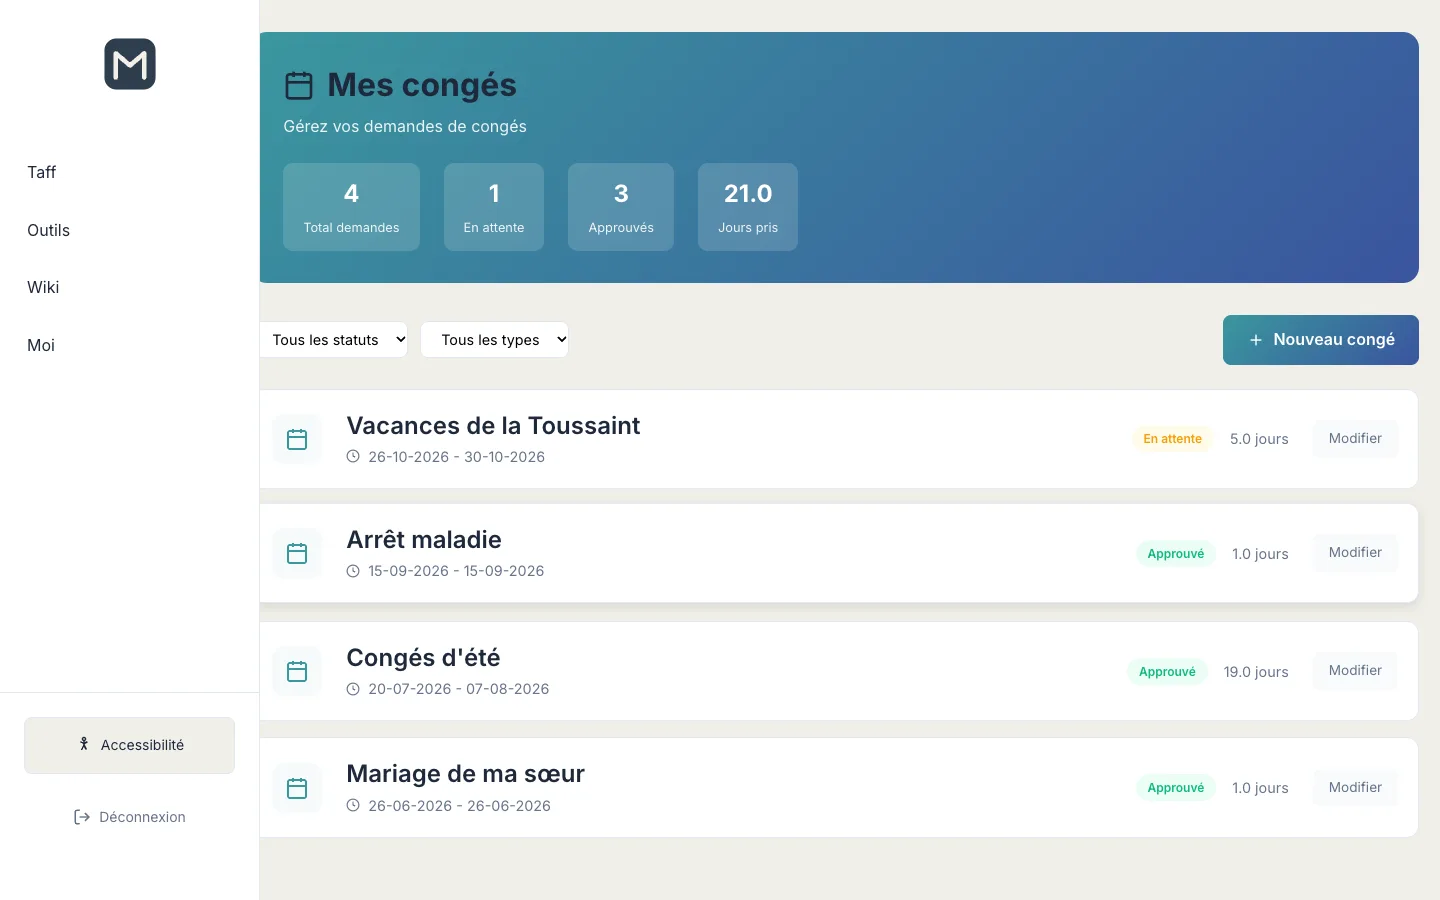
At the top, four counters: Total demandes (Total requests), En attente (Pending), Approuvés (Approved) and Jours pris (Days taken) (the sum of the days of approved requests).
Each request shows its title, dates, status and number of days:
- En attente: the request has not yet been processed;
- Approuvé: the leave is granted;
- Refusé (Refused): the leave is not granted; the note often explains why;
- Annulé (Cancelled): the request has been withdrawn.
The number of days is calculated from the first to the last day inclusive, weekends included: a week from Monday to Friday counts as 5 days, from Monday to the following Friday as 12.
The two drop-down lists filter by status and by type: paid leave, sick leave, unpaid leave or other.
Requesting leave
- Click Nouveau congé (New leave) (or open Moi › Mes jours de congés).
- Give your request a title, for example “All Saints' holidays”.
- Choose the start date and the end date using the calendar.
- Choose the type: Congés payés, Maladie, Sans solde or Autre (Paid leave, Sick leave, Unpaid leave or Other).
- Leave the status on En attente and add a note if needed.
- Click Sauvegarder. Annuler takes you back to the list.
A request's Modifier button reopens the same form. You only see and edit your own requests; a Super User sees those of the whole team.
The client area
When a client logs in, they land on their Tableau de bord. Their menu is reduced to the essentials: Tableau de bord, Site(s), Formation (Training), Administratif and Moi.
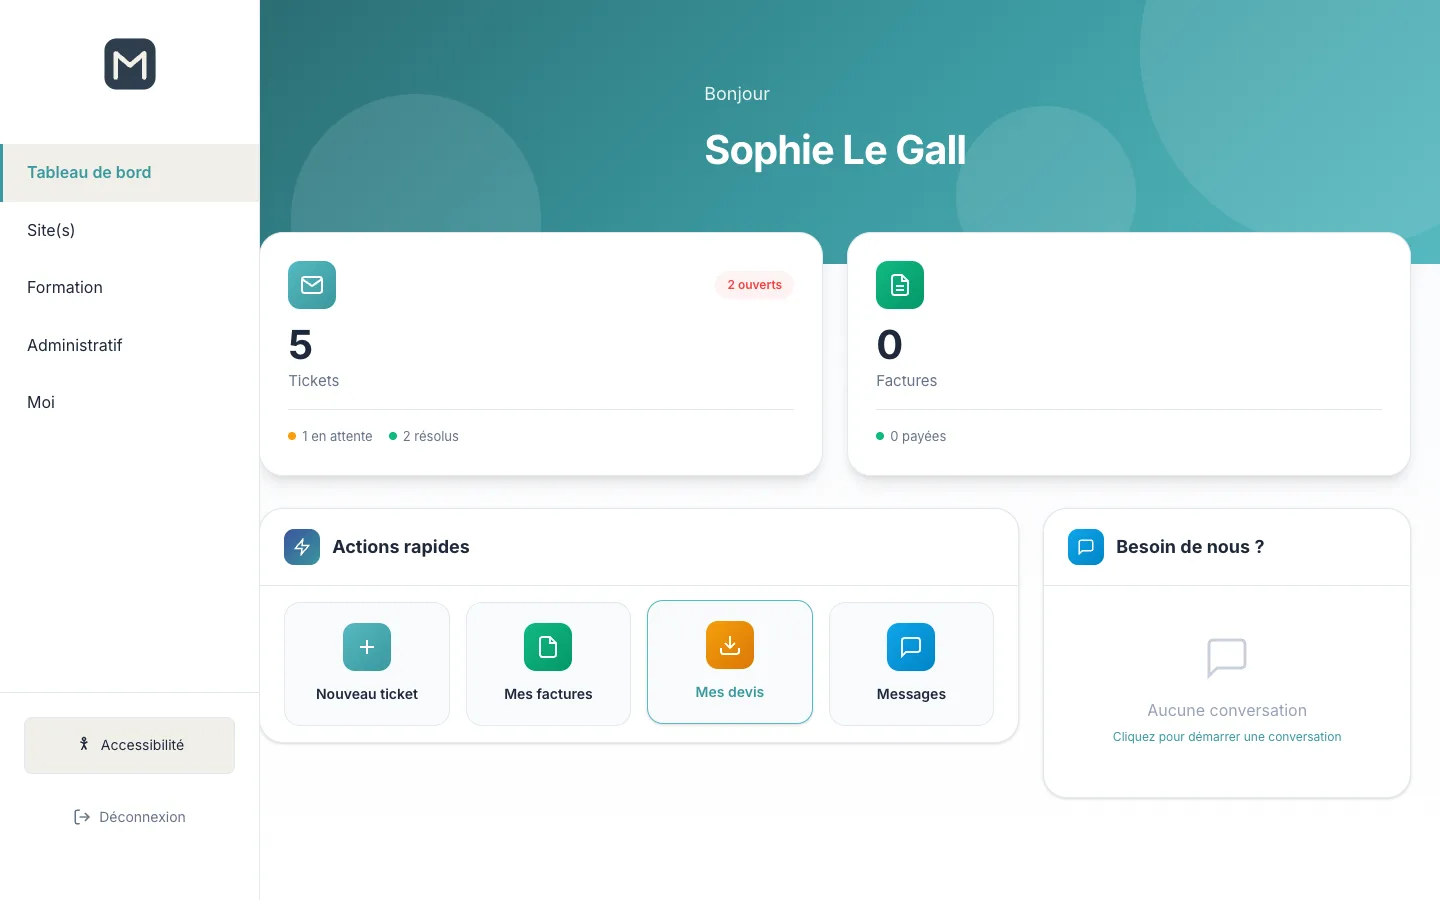
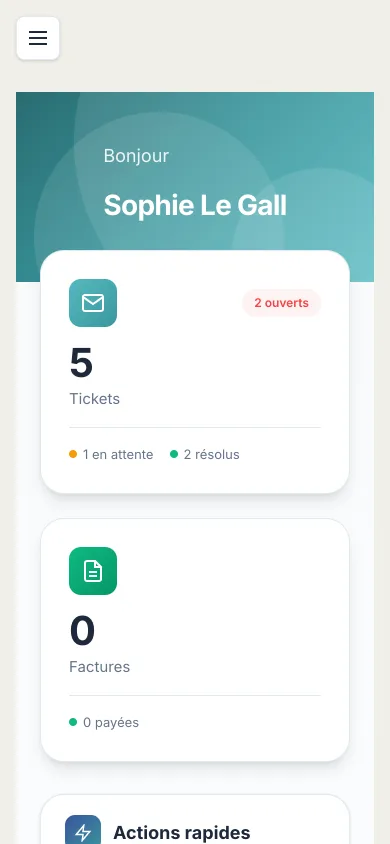
- The Tickets card counts their requests: the red badge shows open or in-progress tickets, followed by the breakdown en attente (pending) and résolus (resolved) (resolved or closed). With full company access, the client sees the tickets of their whole company; otherwise, only their own.
- The Factures (Invoices) card counts their invoices and those that are paid. It fills in when the Pennylane connection is active (see below).
- Actions rapides (Quick actions): Nouveau ticket (New ticket), Mes factures (My invoices), Mes devis (My quotes) and Messages.
- Besoin de nous ? (Need us?) invites them to start a conversation with your team.
The client's profile
In Moi, the client updates their job title, phone numbers, LinkedIn profile and biography, exactly like a staff member.
Company information
Administratif › Informations de l'entreprise lets the client keep up to date the data used on their invoices and documents.
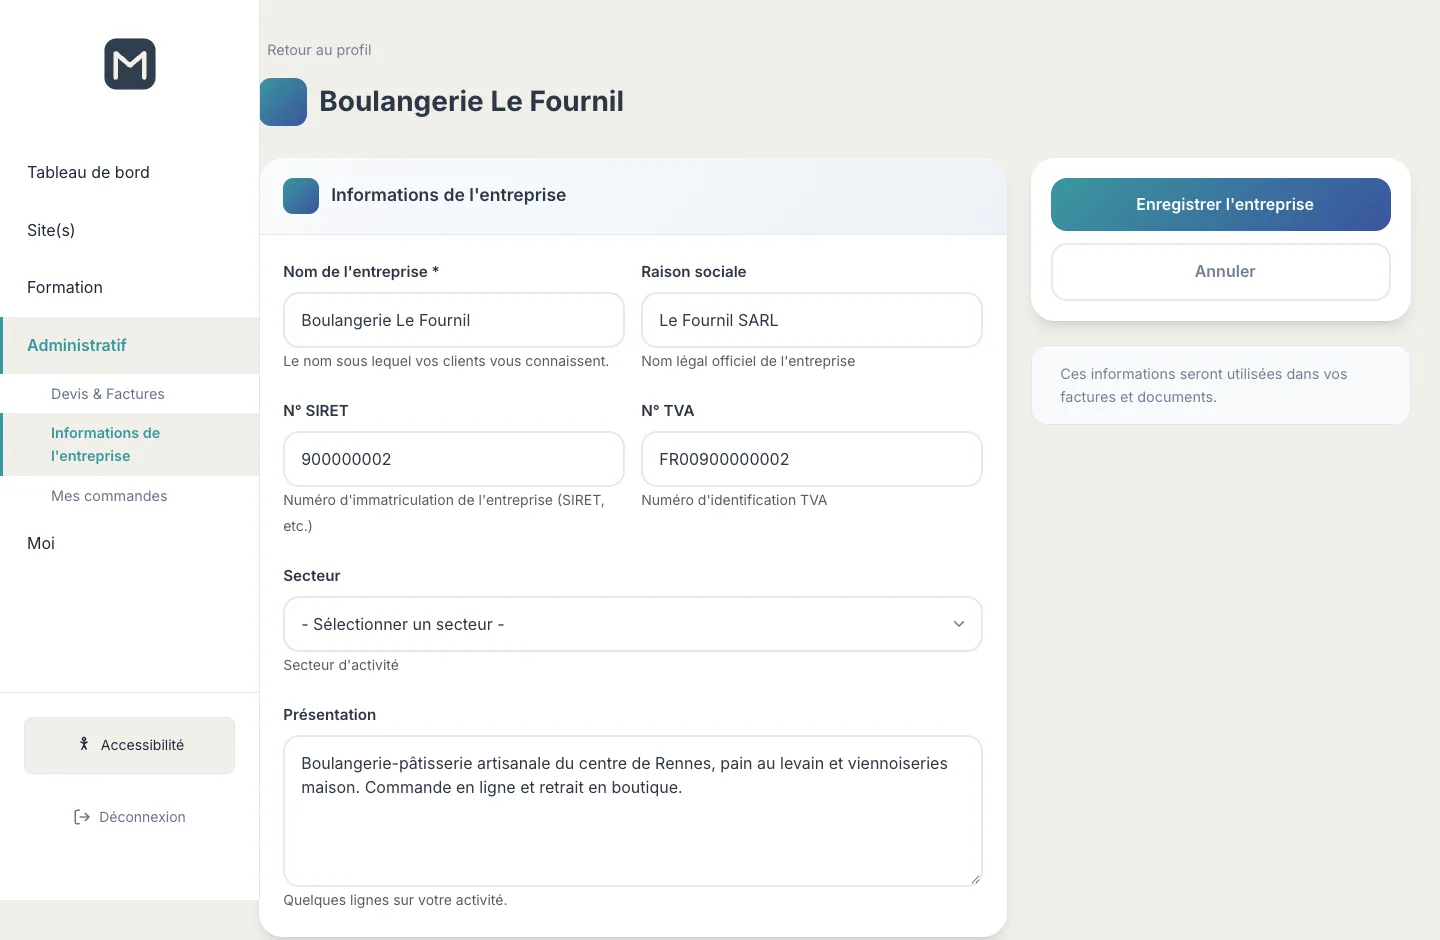
- Check the company name (the one their customers know) and the legal name.
- Complete the SIRET no. and the VAT no.
- Choose a sector and write a short presentation.
- Click Enregistrer l'entreprise (Save company).
A client whose account is not yet linked to any company sees a form to create one instead: they become its manager, with access to all departments.
Invoices and quotes
Invoices and quotes are not entered in Contexte: they are read live from your Pennylane accounting software. These pages therefore only fill in if the Pennylane connection has been configured by the administrator and the client's company is linked to it. Without this connection, they stay empty.
Devis & Factures (client side)
The client opens Administratif › Devis & Factures (they need access to the Facturation department). They find there:
- four counters: Total Factures, En attente, Montant Total and Montant Dû (Total invoices, Pending, Total amount and Amount due);
- two tabs, Factures and Devis;
- for each invoice, its status (Payée (Paid), En attente or En retard (Overdue)), the Télécharger PDF (Download PDF) button and, for an invoice to be paid, the Payer maintenant (Pay now) button, which opens the Pennylane payment link;
- for each quote, its status (En attente or Accepté (Accepted)) and its PDF.
Factures impayées (Super Users)
Compta › Factures impayées lists all unpaid invoices, across all clients.
- At the top: the number of unpaid invoices, the total due and the number of invoices chased.
- The Toutes (All), En retard, Échéance proche (Due soon) and Pas encore échue (Not yet due) tabs sort the invoices by due date; the Retard min. (jours) (Min. delay (days)) and Relancées uniquement (Chased only) filters refine the list.
- Each row gives the client, number, date, due date, delay, amount and the last reminder (or “Jamais relancée” (Never chased)).
- Relancer (Chase) opens a pre-filled message (recipient, subject, text). Envoyer un test (Send a test) sends it to you first; Envoyer la relance (Send the reminder) sends it to the client. If the client has no address, Ajouter un e-mail (Add an email) lets you enter one and save it for next time.
- Resynchroniser (Resync) forces a fresh read from Pennylane: the data is cached for 24 hours.
Factures fournisseurs (Super Users)
Compta › Factures fournisseurs lists your suppliers' invoices, those to be paid first.
- At the top: the number of invoices, the number to pay and the total to pay.
- Filter by status (À payer (To pay), À traiter (To process), Payée (Paid)), by category and by delay, with the same due-date tabs as the unpaid invoices.
- Annoter (Annotate) an invoice gives it an internal status (À payer, Planifiée (Scheduled) or Payée) and an optional note; Marquer payée (Mark as paid) does it in one click.
Frequently asked questions
I cannot see the Personnes or Entreprises menu.
These pages are reserved for the partners of your organisation. Ask your administrator to check your account's group.
The attendance page shows “Vous n’êtes pas enregistré comme employé” (You are not registered as an employee).
The attendance calendar needs a contact record linked to your account. Ask a partner to open your record in Personnes and fill in the user account.
Why does my leave from Monday to Monday count as 8 days?
The number of days in a request counts every calendar day between the start date and the end date inclusive, weekends included.
A client only sees their own tickets, not those of their colleagues.
Open their contact record and enable Accès complet à l'entreprise: they will then see all the tickets of their company.
A client sees “Accès refusé” (Access denied) when opening Devis & Factures.
Tick the Facturation department in Accès aux départements on their contact record.
The invoice pages are empty.
They read data from Pennylane live. Check with your administrator that the Pennylane connection is configured and that the client's company is linked to it, then click Resynchroniser.